<?xml version="1.0" encoding="utf-8"?><feed xmlns="http://www.w3.org/2005/Atom" ><generator uri="https://jekyllrb.com/" version="3.10.0">Jekyll</generator><link href="https://blog.010.one/feed.xml" rel="self" type="application/atom+xml" /><link href="https://blog.010.one/" rel="alternate" type="text/html" /><updated>2024-09-27T09:32:56+00:00</updated><id>https://blog.010.one/feed.xml</id><title type="html">xarantolus</title><subtitle></subtitle><author><name>xarantolus</name><email>x@010.one</email></author><entry><title type="html">Don’t snipe me in space - intentional flash corruption for STM32 microcontrollers</title><link href="https://blog.010.one/Dont-snipe-me-in-space-intentional-flash-corruption-for-stm32-microcontrollers" rel="alternate" type="text/html" title="Don’t snipe me in space - intentional flash corruption for STM32 microcontrollers" /><published>2024-07-20T00:00:00+00:00</published><updated>2024-07-20T00:00:00+00:00</updated><id>https://blog.010.one/Dont-snipe-me-in-space-intentional-flash-corruption-for-stm32-microcontrollers</id><content type="html" xml:base="https://blog.010.one/Dont-snipe-me-in-space-intentional-flash-corruption-for-stm32-microcontrollers"><![CDATA[<p>Almost one and a half years ago I joined <a href="https://warr.de/en/projects/move/">MOVE</a>, the <strong>M</strong>unich <strong>O</strong>rbital <strong>V</strong>erification <strong>E</strong>xperiment, a student club focusing on practical education in the area of satellites at the <a href="https://www.tum.de/">Technical University of Munich</a>. MOVE has launched three CubeSats to date (<a href="https://warr.de/en/projects/move/first-move/">First-MOVE in 2013</a>, <a href="https://warr.de/en/projects/move/move-ii-and-move-iib/">MOVE-II in 2018 and MOVE-IIb in 2019</a>), and we are currently preparing two future missions. These missions require reliable software, and the ability to update in orbit.</p>

<p>One of the first larger projects I took part in was building a bootloader for the <a href="https://www.st.com/en/microcontrollers-microprocessors/stm32l4r5-s5.html">STM32L4R5ZI MCU</a>, which should enable us to do reliable on-orbit software updates. This MCU has 2 MB of flash storage, which we use to store the bootloader, firmware images and additional metadata (e.g. checksums for firmware images).</p>

<h3 id="bootloader-requirements-and-reliability">Bootloader requirements and reliability</h3>

<p>The bootloader, which is written in Rust, is the first part of our software stack that runs. It has to be extremely reliable, even in really weird situations, because a failure of the bootloader could lead to a loss of the MCU or even the entire mission (depending on the exact design of the remaining system).</p>

<p>Let’s first take a look at what the bootloader actually does. It manages <strong>3 slots</strong> for operating system images, with each having around 500 KB reserved for it. Additionally, <strong>2 redundant metadata</strong> structs are stored on different flash pages. During an update, one slot is overwritten, and then metadata is adjusted. We are resilient against power failures at any point, and as long as at least one image slot contains an operating system image, we can boot.</p>

<p>To ensure all of this works as expected, we verify some properties using <a href="https://model-checking.github.io/kani/">Kani</a>, and we guarantee that no panic handler ends up in the binary (this mostly requires the compiler to prove that no bounds checks can fail, thus optimizing them away, thus making panic unreachable). We also have hardware tests in our CI pipeline that run against the actual bootloader on the target MCU, of which multiple are connected to a self-hosted GitLab runner. Additionally, we use the watchdog of the MCU to reset the chip in case our code would get stuck in some endless loop.</p>

<p>While this gets us pretty far, there are still some situations we have not yet handled, especially regarding interrupts. We don’t actually care about most interrupts in the bootloader, so we just tell the CPU to not handle them. Easy, right?</p>

<p>Well, it’s not that easy. There are some situations where a non-maskable interrupt (NMI) will be triggered, and you <strong>can’t ignore them</strong>. One of them is the ECCD non-maskable interrupt (ECC detection).</p>

<h3 id="flash-ecc-and-related-interrupts">Flash ECC and related interrupts</h3>

<p>The microcontroller has 2MB of flash storage with ECC. This means that for every 64 bit, it stores an additional 8 bits of error checking information. When reading from the flash, this information is automatically checked to detect bit flips. These can happen for a variety of reasons. In the case of satellites, radiation exposure can be a cause.</p>

<p>The manual states the following about what happens when you read from a block with one or more bit flips:</p>

<blockquote>
  <p>When one error is detected and corrected, the flag ECCC (ECC correction) is set in Flash ECC register (FLASH_ECCR). If ECCCIE is set, an interrupt is generated.</p>

  <p>When two errors are detected, a flag ECCD (ECC detection) is set in FLASH_ECCR register. In this case, a NMI is generated.</p>
</blockquote>

<p>If we have the first situation, that’s fine, because we just read and get the correct value. The second one is the problem, because it <strong>disrupts our program flow</strong>. Even worse, if this error happens when reading an operating system image, and we were to always try the same one (we have some mitigation against this), we could land in a boot loop if we don’t handle the situation.</p>

<p>Writing a handler for the flash ECCD NMI isn’t particularly hard using the <a href="https://docs.rs/cortex-m-rt/latest/cortex_m_rt/">cortex_m_rt</a> and <a href="https://docs.rs/stm32l4/latest/stm32l4/">stm32l4</a> crates:</p>

<div class="language-rust highlighter-rouge"><div class="highlight"><pre class="highlight"><code><span class="nd">#[cortex_m_rt::exception]</span>
<span class="k">unsafe</span> <span class="k">fn</span> <span class="nf">NonMaskableInt</span><span class="p">()</span> <span class="k">-&gt;</span> <span class="o">!</span> <span class="p">{</span>
	<span class="k">let</span> <span class="n">peripherals</span> <span class="o">=</span> <span class="k">unsafe</span> <span class="p">{</span> <span class="nn">stm32l4r5</span><span class="p">::</span><span class="nn">Peripherals</span><span class="p">::</span><span class="nf">steal</span><span class="p">()</span> <span class="p">};</span>
	<span class="k">let</span> <span class="n">reg_content</span> <span class="o">=</span> <span class="n">peripherals</span><span class="py">.FLASH.eccr</span><span class="nf">.read</span><span class="p">();</span>
	<span class="k">let</span> <span class="n">is_flash_nmi</span><span class="p">:</span> <span class="nb">bool</span> <span class="o">=</span> <span class="p">{</span>
		<span class="cd">/// Note: initializes our custom flash abstraction</span>
		<span class="k">let</span> <span class="n">flash</span> <span class="o">=</span> <span class="nn">Flash</span><span class="p">::</span><span class="nf">new</span><span class="p">(</span><span class="n">peripherals</span><span class="py">.FLASH</span><span class="p">);</span>
		<span class="k">if</span> <span class="n">flash</span><span class="nf">.is_dualbank</span><span class="p">()</span> <span class="p">{</span>
			<span class="cd">/// In dual-bank mode, Bit 29 (ECCD2) is reserved, so only look at bit 31 (ECCD)</span>
			<span class="n">reg_content</span><span class="nf">.eccd</span><span class="p">()</span><span class="nf">.bit_is_set</span><span class="p">()</span>
		<span class="p">}</span> <span class="k">else</span> <span class="p">{</span>
			<span class="cd">/// Bit 31 and Bit 29 - either lower or upper 64 bits of 128 bit value</span>
			<span class="k">const</span> <span class="n">ECCD_ECCD2_MASK</span><span class="p">:</span> <span class="nb">u32</span> <span class="o">=</span> <span class="mi">0xa0000000</span><span class="p">;</span>
			<span class="n">reg_content</span><span class="nf">.bits</span><span class="p">()</span> <span class="o">&amp;</span> <span class="n">ECCD_ECCD2_MASK</span> <span class="o">!=</span> <span class="mi">0</span>
		<span class="p">}</span>
	<span class="p">};</span>

	<span class="cd">/// Address on 1MB bank + which bank it's on</span>
	<span class="k">let</span> <span class="n">dead_addr</span> <span class="o">=</span> <span class="n">reg_content</span><span class="nf">.addr_ecc</span><span class="p">()</span><span class="nf">.bits</span><span class="p">()</span> <span class="p">|</span> <span class="p">((</span><span class="n">reg_content</span><span class="nf">.bk_ecc</span><span class="p">()</span><span class="nf">.bit</span><span class="p">()</span> <span class="k">as</span> <span class="nb">u32</span><span class="p">)</span> <span class="o">&lt;&lt;</span> <span class="mi">20</span><span class="p">);</span>

	<span class="cd">/// Some actual logic to handle this information</span>
	<span class="k">if</span> <span class="n">is_flash_nim</span> <span class="p">{</span>
		<span class="cd">/// dead_addr has problems</span>
	<span class="p">}</span>
<span class="p">}</span>
</code></pre></div></div>

<p>We essentially check a few bits to know that this is actually the flash ECCD NMI, and then extract the flash address of the offending 64 bit block.</p>

<p>In our bootloader we can now enable a custom boot mode that ensures that if at least one image is bootable, it is booted, which will enable us to fix this problem remotely.</p>

<p>That’s the theory. But how can we ensure that this works, and that our code handles this situation correctly? Usually, we would just run it in our tests, and see how it’s doing.  However, since this handles a specific interrupt, we somehow need to trigger it intentionally. In other words, we need to mark certain blocks of the flash to make them trigger ECCD NMIs.</p>

<h3 id="placing-eccd-nmis">Placing ECCD NMIs</h3>
<p>The STM32L4R5, as far as I know, does not offer a feature that enables us to generate an NMI on a custom-defined flash address. But that is exactly what we need to test our interrupt handler.</p>

<p>So I set out to explore my favorite RM0432 reference manual a bit more and found this interesting note:</p>

<blockquote>
  <p>Note: The contents of the Flash memory are not guaranteed if a device reset occurs during a Flash memory operation.</p>
</blockquote>

<p>This gave me hope that it might be possible to corrupt a block when triggering a reset during a write operation, so I got to writing a small program that does the following:</p>
<ul>
  <li>First, the program reads the flash address it should corrupt
    <ul>
      <li>If it is already corrupted, the NMI handler will be executed. I’ve written one that turns on the green LED of the chip</li>
    </ul>
  </li>
  <li>Enable the hardware watchdog to reset us after a fixed time interval</li>
  <li>Spend the majority of that time interval in a loop that busy-waits</li>
  <li>Just towards the end, start a write operation into the flash</li>
</ul>

<p>Then hopefully, the watchdog would reset us exactly when the write operation happens. And that actually turned out to work sometimes, I was really happy when I first saw the green LED come on.</p>

<p>To verify that the code actually did what I thought, I connected GDB to the chip and read out the <code class="language-plaintext highlighter-rouge">FLASH_ECCR</code> register, which contains information about flash ECC interrupts:</p>

<div class="language-plaintext highlighter-rouge"><div class="highlight"><pre class="highlight"><code>(gdb) x/wx 0x40022018
0x40022018:     0x80006000
</code></pre></div></div>

<p>In the value <code class="language-plaintext highlighter-rouge">0x80006000</code>, the top bit means that the interrupt is actually the ECCD interrupt. The lowest 20 bit, or the last 5 hex characters, are the address of the block that was found to have two or more errors. This was exactly the address I had configured it to damage, so it was really nice to see it work as intended.</p>

<p>However, this would only work sometimes. The wait time can vary due to timings being slightly different, depending on temperature and other things, so a more dynamic approach that finds the correct timing was required.</p>

<h4 id="binary-search-over-multiple-resets">Binary search over multiple resets</h4>
<p>The approximate unit of time to wait varies a bit, but is in a certain range. In this case “unit of time” really just means how much overhead an almost empty loop has, because that’s what I used to wait before the flash programming start (there are honestly better ways, but this is one way, and it works).</p>

<p>So what I wanted to build is a binary search that keeps its state over resets. Keeping state is kind of the opposite of what a reset is intended to do, so a way to store data across resets was needed. The real time clock (RTC) of the MCU has 32 backup registers, which store 32 bits each. They are kept over multiple resets and thus enable us to keep state such as the bottom and top of the range that we are searching.</p>

<p>When doing a step, we first calculate the middle of the waiting range, busy-wait that amount of iterations, and then initiate flash programming. Once it’s finished, the blue LED turns on. Afterwards (or hopefully <em>during</em> the programming operation), the watchdog reset happens. The blue LED thus indicates that we need a lower timing. If the process worked, the green LED comes on, otherwise a next reset happens. If the program got into a spot where it cannot advance further (timings are a bit random after all), the red LED will come on. In that case, a manual reset can be done.</p>

<p>With that in mind, this is what destroying an address looks like in practice (Note the LD1-LD2 LEDs):</p>

<p>
<video controls="" muted="" style="width:100%;height:100%;margin-left:auto;margin-right:auto;object-fit:cover">
    <source src="assets/stm32/flash-corruption.mp4" type="video/mp4" />

</video></p>

<p>That’s essentially the entire thing in action. If the blue LED comes on, we have missed the point where we can interrupt, so once the watchdog triggers, we try again with a lower value. After a short pause of not seeing the LED turn on (this is where we took too little time and stopped before even programming the flash), short pulses return. At some point, we get the right timing, leading to a flash ECCD NMI, which is handled by turning on the green LED.</p>

<p>I uploaded the program to <a href="https://github.com/xarantolus/stm32-flash-corruptor">GitHub</a>, so feel free to use it in your own testing.</p>

<h3 id="testing-the-bootloader">Testing the bootloader</h3>
<p>With this new tool under our belt, we can now intentionally affect flash addresses, especially ones on the metadata and image slot pages. Using the tool, I was able to verify that the bootloader can still boot our operating system even if <strong>all metadata pages</strong> and <strong>all but one operating system image</strong> contain a block where reading leads to an NMI.</p>

<p>This now gives me a reasonable peace of mind, even when the bootloader will be in space. To be honest, I will probably still have some worries for my first code in space, but at least now there is one less unknown.</p>

<h3 id="final-note">Final note</h3>
<p>If you think this kind of stuff is interesting and your company might be interested in supporting or sponsoring our <a href="https://warr.de/en/projects/move/">student club</a>, please reach out to me at <a href="mailto:philipp.erhardt@warr.de">philipp.erhardt@warr.de</a>. Additionally, if your company has some space left on a satellite and wants to enable the next generation of builders to get hands-on experience, please also reach out. We are thankful for any support.</p>

<p>If you’re interested in hearing more about MOVE, satellites, or just want to stay updated on things like this, feel free to subscribe to the RSS feed of my blog or follow me on <a href="https://www.linkedin.com/in/erhardt-philipp/">LinkedIn</a>.</p>

<p>Thank you for reading!</p>]]></content><author><name>xarantolus</name><email>x@010.one</email></author><summary type="html"><![CDATA[Almost one and a half years ago I joined MOVE, the Munich Orbital Verification Experiment, a student club focusing on practical education in the area of satellites at the Technical University of Munich. MOVE has launched three CubeSats to date (First-MOVE in 2013, MOVE-II in 2018 and MOVE-IIb in 2019), and we are currently preparing two future missions. These missions require reliable software, and the ability to update in orbit.]]></summary><media:thumbnail xmlns:media="http://search.yahoo.com/mrss/" url="https://blog.010.one/assets/stm32/sniper.jpg" /><media:content medium="image" url="https://blog.010.one/assets/stm32/sniper.jpg" xmlns:media="http://search.yahoo.com/mrss/" /></entry><entry><title type="html">How to fix fastboot device not visible and recovery flashing being stuck on Windows 11</title><link href="https://blog.010.one/Fix-fastboot-recovery-flashing-stuck-forever" rel="alternate" type="text/html" title="How to fix fastboot device not visible and recovery flashing being stuck on Windows 11" /><published>2023-02-23T00:00:00+00:00</published><updated>2023-02-23T00:00:00+00:00</updated><id>https://blog.010.one/Fix-fastboot-recovery-flashing-stuck-forever</id><content type="html" xml:base="https://blog.010.one/Fix-fastboot-recovery-flashing-stuck-forever"><![CDATA[<p>I like trying out different Android-based operating systems and custom recoveries on my phone.</p>

<p>A custom recovery is basically a small operating system on your phone that you can boot into, allowing you to do things like flashing a new operating system or overwriting certain partitions. If you have used <a href="https://github.com/topjohnwu/Magisk">Magisk</a> before, you’ve probably used a custom recovery to flash a patched boot image to root your phone.</p>

<p>The basic steps to installing a recovery are the following:</p>
<ul>
  <li>Make sure you have <code class="language-plaintext highlighter-rouge">adb</code> and <code class="language-plaintext highlighter-rouge">fastboot</code> installed on your PC</li>
  <li>Put the phone in fastboot mode (usually by pressing the power button and volume down button at the same time while booting)</li>
  <li>Run <code class="language-plaintext highlighter-rouge">fastboot devices</code> to make sure the device is visible to fastboot
    <ul>
      <li>This is where I had the first problem, a fix for Windows 11 is described below</li>
    </ul>
  </li>
  <li>Flash the recovery image
    <ul>
      <li>This is where I had a second problem: the flashing process seemed to be stuck forever. There’s a fix for that as well.</li>
    </ul>
  </li>
</ul>

<p>So now let’s get into installing a custom recovery.</p>

<h3 id="make-the-device-visible-to-fastboot">Make the device visible to fastboot</h3>
<p>To install a custom recovery, we use the <code class="language-plaintext highlighter-rouge">fastboot</code> tool. If you don’t have it installed, visit the <a href="https://developer.android.com/studio/releases/platform-tools">official Android developer page</a> and download the latest version for your operating system.</p>

<p>Put your device into fastboot mode and make sure it is recognized:</p>

<div class="language-plaintext highlighter-rouge"><div class="highlight"><pre class="highlight"><code>fastboot devices
</code></pre></div></div>

<p>In my case, the device didn’t show up in this list despite being in fastboot mode.</p>

<p>It took me ages to find the fix for that, so I decided to write this post to help others who might run into the same problem.</p>

<p>At first I installed the <a href="https://adb.clockworkmod.com/">Universal ADB Drivers</a> and made sure my <code class="language-plaintext highlighter-rouge">adb</code> and <code class="language-plaintext highlighter-rouge">fastboot</code> tools were at the latest version. However, neither of these fixed the problem.</p>

<p>At some point I found something interesting in the Windows 11 Update Settings: when going to Windows Update &gt; Advanced Options &gt; Optional Updates, there were some driver updates related to Android tools. I installed them and listed the devices again. This time, my device showed up.</p>

<h3 id="flashing-the-recovery-image">Flashing the recovery image</h3>
<p>Now it was time to flash the recovery image.</p>

<p>Installing a new custom recovery is rather easy if you know a bit on how to use command-line tools. When I recently installed OrangeFox, I downloaded <a href="https://orangefox.download/device/chiron">the version for my phone</a> (yours will <strong>very likely be different</strong>, so check your device codename etc!), unzipped the zip file and ran the following command in the folder where the recovery image was located:</p>

<div class="language-plaintext highlighter-rouge"><div class="highlight"><pre class="highlight"><code>fastboot flash recovery recovery.img
</code></pre></div></div>

<p>Fastboot was able to find my device, but the flashing process seemed to be stuck forever. After a few minutes I unplugged my phone, plugged it back in and also rebooted into fastboot mode. However, on the next attempt the flashing process was still stuck. Using different USB cables and ports didn’t help either.</p>

<p><strong>What did fix the problem was the following</strong>:</p>
<ol>
  <li>Make sure the device is in fastboot mode</li>
  <li>Unplug the device from the computer</li>
  <li>
    <p>Now run the following command:</p>

    <div class="language-plaintext highlighter-rouge"><div class="highlight"><pre class="highlight"><code> fastboot flash recovery recovery.img
</code></pre></div>    </div>
  </li>
  <li>This should show the <code class="language-plaintext highlighter-rouge">&lt; waiting for any device &gt;</code> message</li>
  <li>Plug the device back in and wait for the flashing process to finish</li>
  <li>Now flashing the recovery took around 2 seconds to complete</li>
</ol>

<p>While a bit of a weird hack, in the end these were the steps that worked.
I hope this helped you fix the problem as well.</p>]]></content><author><name>xarantolus</name><email>x@010.one</email></author><category term="Android" /><category term="Windows 11" /><category term="fastboot" /><category term="recovery" /><summary type="html"><![CDATA[This post shows how to fix two errors I ran into while flashing a custom recovery image using fastboot on Windows 11.]]></summary></entry><entry><title type="html">Declarative scraping for the modern web, or why your scraper breaks all the time</title><link href="https://blog.010.one/declarative-web-scraping-for-the-modern-web" rel="alternate" type="text/html" title="Declarative scraping for the modern web, or why your scraper breaks all the time" /><published>2022-02-21T00:00:00+00:00</published><updated>2022-02-21T00:00:00+00:00</updated><id>https://blog.010.one/declarative-web-scraping-for-the-modern-web</id><content type="html" xml:base="https://blog.010.one/declarative-web-scraping-for-the-modern-web"><![CDATA[<p>There are certain command-line tools we all use a lot. Whether it’s the GNU core utilities for quickly getting info about files, FFmpeg to convert between different image formats or <a href="https://github.com/ytdl-org/youtube-dl"><code class="language-plaintext highlighter-rouge">youtube-dl</code></a> to just download that small sound effect without having to find yet another free downloading site.</p>

<p>However, not all of theses tools are the same. How often have you updated the GNU core utils to try a new feature? Likely never. I have only updated FFmpeg intentionally like <em>once</em>, and that was when I came across a <code class="language-plaintext highlighter-rouge">webp</code> file for the first time. <code class="language-plaintext highlighter-rouge">youtube-dl</code> however? Very often.</p>

<p>That’s because the sites supported by it change all the time. The maintainers play the cat-and-mouse game and update the tool to fix yet another scraper that broke and prevented people from downloading yet another batch of sound effects.</p>

<p>The answer to why this happens is likely obvious to most readers, but stay with me for a different approach.</p>

<h3 id="how-web-scraping-works">How web scraping works</h3>
<p>Most web-scraper work very similar: they download an HTML page, parse it into a tree of elements and then run queries on that parsed tree.
They define stuff like “I want the inner text of the <code class="language-plaintext highlighter-rouge">span</code> with the class <code class="language-plaintext highlighter-rouge">price</code>”, or “get the attribute <code class="language-plaintext highlighter-rouge">src</code> of the first <code class="language-plaintext highlighter-rouge">video</code> tag”. These are all fine things, but they are prone to breaking. If a CSS class is renamed or an element is moved somewhere else, the scraper breaks and needs to be fixed.</p>

<p>It’s even worse when programs need to extract JSON data from within a page. A <a href="https://github.com/ytdl-org/youtube-dl/blob/34722270741fb9c06f978861c1e5f503291070d8/youtube_dl/extractor/youtube.py#L285">regex like the following</a> works, but is also really prone to breaking:</p>

<div class="language-python highlighter-rouge"><div class="highlight"><pre class="highlight"><code><span class="n">_YT_INITIAL_DATA_RE</span> <span class="o">=</span> <span class="sa">r</span><span class="s">'(?:window\s*\[\s*["\']ytInitialData["\']\s*\]|ytInitialData)\s*=\s*({.+?})\s*;'</span>
</code></pre></div></div>

<p>And after that regex was used to extract data, there’s still the problem that sites like YouTube deliver a <em>very</em> nested JSON document with at least a dozen levels of depth.</p>

<p>So in general, I think it is fair to say that imperatively describing how to get data from the page works fine <em>for a while</em>, but starts to break on most small changes, requiring updates.</p>

<h4 id="sql">SQL</h4>
<p>Let’s talk about SQL for a bit. Yes, it has almost nothing to do with web scraping, but it has some nice properties I think we <em>should have</em> in web scraping.</p>

<p>The difference between SQL and most other languages we programmers use is that SQL is declarative. This means that we don’t tell the database system what it should do do get the data, we just tell it <em>what kind of data</em> we want. We define properties and conditions the result must have. The database management system must find a way to satisfy our query <em>somehow</em>. As users of database systems we don’t need to know or care whether the <code class="language-plaintext highlighter-rouge">where</code> condition was executed as an Index-Join, Hash-Join or a nested loop. We just get the data.</p>

<p>In web scraping we use the usual, imperative way of describing how to get different variables from the page. Sometimes we even programmatically navigate a browser just because the site is rendered exclusively using JavaScript.</p>

<p>I think we should do web scraping differently, a bit more like SQL.</p>

<h3 id="a-declarative-approach">A declarative approach</h3>
<p>Now let’s think about how we could bring a more declarative approach to web scraping.</p>

<p>Modern web sites that use JavaScript for rendering their content often come with a rather large snippet of JSON data in their payload that describes what kind of page should actually be shown. We could now do the naive approach of extracting the JavaScript variable using a regex, but we also know that this is prone to breaking in the future.</p>

<p>Another problematic thing about this is the structure of the JSON data itself: if you want to get elements that are nested 20 levels deep, there are 20 different chances of something being renamed and breaking your scraper.</p>

<p><strong>So here are basically the key points a declarative approach should solve</strong>:</p>
<ol>
  <li><strong>Stop relying on data location</strong> (e.g. “the object after <code class="language-plaintext highlighter-rouge">var x = {...}</code>”)</li>
  <li><strong>Reduce dependency on internal data naming</strong> (e.g. the keys within the extracted JSON data)</li>
</ol>

<p>And if we think about it, it actually sounds pretty easy: just write a program that finds any (largeish) JSON object in a page and then iterate over all levels in it to find what we are looking for (e.g. all objects with a <code class="language-plaintext highlighter-rouge">title</code> and <code class="language-plaintext highlighter-rouge">videoId</code> key).</p>

<p>If the tool is able to find <em>any</em> object in a page, we also don’t need to care about the position of the data anymore. And if we only rely on a minimal set of attributes the objects we’re looking for should have, then we don’t need to care if someone changes the structure of everything else.</p>

<p>Enter <code class="language-plaintext highlighter-rouge">jsonx</code>, a tool that does just that. If you have the <a href="https://go.dev/">Go</a> toolchain installed, you can just install it from source using the following command. Alternatively, there’s binaries for Linux and Windows <a href="https://github.com/xarantolus/blog/releases/tag/jsonx">here</a>.</p>

<div class="language-sh highlighter-rouge"><div class="highlight"><pre class="highlight"><code>go <span class="nb">install </span>github.com/xarantolus/jsonextract/cmd/jsonx@latest
</code></pre></div></div>

<p>Now we can just tell the tool to get all objects that have a <code class="language-plaintext highlighter-rouge">videoId</code>, <code class="language-plaintext highlighter-rouge">title</code>, and <code class="language-plaintext highlighter-rouge">channelId</code> from a page (I also added <a href="https://stedolan.github.io/jq/"><code class="language-plaintext highlighter-rouge">jq</code></a> for nicer formatting of the output):</p>

<div class="language-sh highlighter-rouge"><div class="highlight"><pre class="highlight"><code><span class="nv">$ </span>jsonx <span class="s2">"https://www.youtube.com/watch?v=-Oox2w5sMcA"</span> videoId title channelId | jq
<span class="o">{</span>
  <span class="s2">"videoId"</span>: <span class="s2">"-Oox2w5sMcA"</span>,
  <span class="s2">"title"</span>: <span class="s2">"Starship Animation"</span>,
  <span class="s2">"lengthSeconds"</span>: <span class="s2">"310"</span>,
  <span class="s2">"channelId"</span>: <span class="s2">"UCtI0Hodo5o5dUb67FeUjDeA"</span>,
  <span class="s2">"isOwnerViewing"</span>: <span class="nb">false</span>,
  <span class="s2">"shortDescription"</span>: <span class="s2">""</span>,
  <span class="s2">"isCrawlable"</span>: <span class="nb">true</span>,
  <span class="s2">"thumbnail"</span>: <span class="o">{</span>
    <span class="s2">"thumbnails"</span>: <span class="o">[</span>
      <span class="o">{</span>
        <span class="s2">"url"</span>: <span class="s2">"https://i.ytimg.com/vi/-Oox2w5sMcA/hqdefault.jpg?sqp=-oaymwEiCKgBEF5IWvKriqkDFQgBFQAAAAAYASUAAMhCPQCAokN4AQ==&amp;rs=AOn4CLDqv77rSQ83UV-8s5rWMX8iInJcgQ"</span>,
        <span class="s2">"width"</span>: 168,
        <span class="s2">"height"</span>: 94
      <span class="o">}</span>,
      <span class="o">{</span>
        <span class="s2">"url"</span>: <span class="s2">"https://i.ytimg.com/vi/-Oox2w5sMcA/hqdefault.jpg?sqp=-oaymwEiCMQBEG5IWvKriqkDFQgBFQAAAAAYASUAAMhCPQCAokN4AQ==&amp;rs=AOn4CLAizx8wyIv50KOlkMRQnj8WAAgJ1w"</span>,
        <span class="s2">"width"</span>: 196,
        <span class="s2">"height"</span>: 110
      <span class="o">}</span>,
      <span class="o">{</span>
        <span class="s2">"url"</span>: <span class="s2">"https://i.ytimg.com/vi/-Oox2w5sMcA/hqdefault.jpg?sqp=-oaymwEjCPYBEIoBSFryq4qpAxUIARUAAAAAGAElAADIQj0AgKJDeAE=&amp;rs=AOn4CLBL7HeKYvEL8u3Glg0SLPGGZNgtSg"</span>,
        <span class="s2">"width"</span>: 246,
        <span class="s2">"height"</span>: 138
      <span class="o">}</span>,
      <span class="o">{</span>
        <span class="s2">"url"</span>: <span class="s2">"https://i.ytimg.com/vi/-Oox2w5sMcA/hqdefault.jpg?sqp=-oaymwEjCNACELwBSFryq4qpAxUIARUAAAAAGAElAADIQj0AgKJDeAE=&amp;rs=AOn4CLDsOBxYvamnjSZZPKkIx87_JttNIQ"</span>,
        <span class="s2">"width"</span>: 336,
        <span class="s2">"height"</span>: 188
      <span class="o">}</span>,
      <span class="o">{</span>
        <span class="s2">"url"</span>: <span class="s2">"https://i.ytimg.com/vi/-Oox2w5sMcA/maxresdefault.jpg"</span>,
        <span class="s2">"width"</span>: 1920,
        <span class="s2">"height"</span>: 1080
      <span class="o">}</span>
    <span class="o">]</span>
  <span class="o">}</span>,
  <span class="s2">"allowRatings"</span>: <span class="nb">true</span>,
  <span class="s2">"viewCount"</span>: <span class="s2">"1421951"</span>,
  <span class="s2">"author"</span>: <span class="s2">"SpaceX"</span>,
  <span class="s2">"isPrivate"</span>: <span class="nb">false</span>,
  <span class="s2">"isUnpluggedCorpus"</span>: <span class="nb">false</span>,
  <span class="s2">"isLiveContent"</span>: <span class="nb">false</span>
<span class="o">}</span>
</code></pre></div></div>

<p>So isn’t that just nice? We just said “I want all objects with these three attributes from this page” and it just worked. No need to look into the full structure of the page or data. We just describe what we want and the tool figures out the rest.</p>

<p>Obviously it relies on some object in the JSON tree having these three attributes, but compared to different approaches this is a <strong>very minimal dependency</strong>. So this approach now “just works”, is simpler to use and is arguably less prone to breaking.</p>

<h4 id="drawbacks">Drawbacks</h4>
<p>As with any approach, this one also has its disadvantages.</p>

<p>First of all, it does not work with all web pages, as most pages deliver their content mostly using HTML. Pages with JSON are somewhat rare, but if the data is there, it will be easy.</p>

<p>The second drawback is that not all data in JavaScript snippets of pages is actually valid JSON. Just add a <code class="language-plaintext highlighter-rouge">NaN</code> somewhere and it’s no longer valid JSON, which would break the scraper. The <code class="language-plaintext highlighter-rouge">jsonx</code> tool works around this by using <a href="https://github.com/tdewolff/parse/">a JavaScript lexer</a> to directly transform some invalid tokens to valid JSON (e.g. <code class="language-plaintext highlighter-rouge">NaN</code> just becomes <code class="language-plaintext highlighter-rouge">null</code>). So <code class="language-plaintext highlighter-rouge">jsonx</code> is very liberal in what it accepts, reminding of the <a href="https://en.wikipedia.org/wiki/Robustness_principle">robustness principle</a>.</p>

<p>The third drawback is somewhat implementation-specific: if you feed thousands of opening braces <code class="language-plaintext highlighter-rouge">[</code> into the tool, it gets noticeably slow. That’s because as soon as it doesn’t find a matching bracket or the content between the two brackets is invalid JSON, it needs to go back to the first bracket and continue from there, possibly doing the same thing over and over (so this <em>can</em> become somewhat of an <code>O(n<sup>2</sup>)</code> complexity if I’m not mistaken). This doesn’t happen much in <em>real</em> pages, but a website looking to fight scrapers could use this implementation weakness.</p>

<h3 id="what-i-want-you-to-do">What I want you to do</h3>
<p>If you build a tool or app that could use this approach, you should definitely try to implement the data extraction part that just looks at everything in a page starting with <code class="language-plaintext highlighter-rouge">[</code> or <code class="language-plaintext highlighter-rouge">{</code> in search for validish JSON data.</p>

<p>Also not relying on the data structure is very important. Feel free to implement logic in a programming language of your choice that parses JSON and dynamically finds only objects with certain keys, no matter the nesting. It’s actually pretty simple, you just need to do a case distinction between arrays (-&gt; recursively iterate all objects in them), objects (-&gt; check if they have all required keys) and primitive data types (ignore).</p>

<p>And if you like the approach, you should implement it in your scraper! This makes the software we use every day more robust, which is a goal we should strive for.</p>

<h3 id="conclusion">Conclusion</h3>
<p>If you found this interesting, feel free to comment by opening an issue on my <a href="https://github.com/xarantolus/blog">blog repository</a> or send me an e-mail.</p>

<p>If you’re interested in low-level Android stuff, you can <a href="https://blog.010.one/how-to-tap-the-android-screen-from-the-underlying-linux-system">read my post about the Linux multitouch protocol on Android</a>. Alternatively if you’ve heard of or have a KNX “smart home” system, you might be interested in <a href="https://blog.010.one/programmatically-interact-with-a-KNX-smart-home-system">this other post about my KNX setup</a>.</p>

<hr />

<h4 id="side-note">Side note</h4>
<p>This is not a rant about <code class="language-plaintext highlighter-rouge">youtube-dl</code>. In fact, I’m a big fan and thankful that people take the time to maintain it. The examples are used to illustrate what we programmers <em>usually</em> do because <em>it works</em> and are not meant to point fingers.</p>]]></content><author><name>xarantolus</name><email>x@010.one</email></author><summary type="html"><![CDATA[Web scrapers break all the time due to changes to websites. This post shows how to scrape modern sites with higher robustness.]]></summary></entry><entry><title type="html">How to programmatically interact with a KNX smart home system</title><link href="https://blog.010.one/programmatically-interact-with-a-KNX-smart-home-system" rel="alternate" type="text/html" title="How to programmatically interact with a KNX smart home system" /><published>2021-08-26T00:00:00+00:00</published><updated>2021-08-26T00:00:00+00:00</updated><id>https://blog.010.one/programmatically-interact-with-a-KNX-smart-home-system</id><content type="html" xml:base="https://blog.010.one/programmatically-interact-with-a-KNX-smart-home-system"><![CDATA[<p><em><strong>Note</strong>: This article is basically a guide on what I had to figure out on my own when interacting programmatically with a KNX system. Some things can be very dependent on how your setup works. I’m also not a KNX expert in any way, much of this stuff was found by “trial and error” instead of reading kind of outdated documentation.</em></p>

<p>Imagine this: You have an an alarm clock that sets itself according to your online calendar. You go to bed without having to set or think about it. And in case an event in the morning gets cancelled, it will notice and adjust your wakeup time while you sleep. No waking up for no reason!</p>

<p>Then when it’s time to wake up, a very soft sound starts playing. You can’t really hear it right now, but it steadily climbs up to a normal volume. At the same time, the light in your room turns on automatically and progresses from very dim to a normal brightness within a minute. At that level of brightness, it’s impossible to go back to sleep.</p>

<p>That’s basically how the mornings of my last few years of school went. The alarm clock ran on a <a href="https://www.raspberrypi.org/">Raspberry Pi</a> and looked at the school’s website to find out if the teachers I had in the morning couldn’t come that day.</p>

<p>The most interesting part of this is how the alarm is able to turn the lights on and off. This is possible thanks to the <a href="https://www.knx.org/knx-en/for-your-home/">KNX</a> system at home. Let’s get into the details.</p>

<p>Note that in the code examples, I will use <a href="https://github.com/vapourismo/knx-go">this KNX library</a> for the programming language <a href="https://go.dev/">Go</a>. It is important to note that the <em>concepts</em> are important, not the code itself. I have also successfully used <a href="https://bitbucket.org/ekarak/knx.js">this Node.JS library</a> in the past, so it really doesn’t matter what you use. There are of course other libraries for other programming languages that might work for you.</p>

<h3 id="connecting">Connecting</h3>
<p>The assumption is that you already have a KNX system that is set up to be able to control the lights and the shutters. As in, when you send the packets from the ETS software, you can control the lights etc.</p>

<p>So what we want to to consists of two steps:</p>
<ul>
  <li>Connect to the KNX system</li>
  <li>Send messages to switch certain lights</li>
</ul>

<p>In my setup, I want to connect to a <a href="https://www.weinzierl.de/index.php/de/alles-knx1/knx-devices/produktarchiv/knx-ip-baos-772">KNX IP BAOS 772</a> (<strong>B</strong>us <strong>A</strong>ccess and <strong>O</strong>bject <strong>S</strong>erver). In KNX terms, this component is called a gateway. There are multiple ways to connect to a KNX system in the Go library I mentioned, but in this case the one we need is the “group tunnel”.</p>

<p>So to connect, we write something like the following code:</p>

<div class="language-go highlighter-rouge"><div class="highlight"><pre class="highlight"><code><span class="c">// Connect to the gateway.</span>
<span class="n">client</span><span class="p">,</span> <span class="n">err</span> <span class="o">:=</span> <span class="n">knx</span><span class="o">.</span><span class="n">NewGroupTunnel</span><span class="p">(</span><span class="s">"10.0.0.7:3671"</span><span class="p">,</span> <span class="n">knx</span><span class="o">.</span><span class="n">TunnelConfig</span><span class="p">{</span>
    <span class="n">ResendInterval</span><span class="o">:</span>    <span class="m">500</span> <span class="o">*</span> <span class="n">time</span><span class="o">.</span><span class="n">Millisecond</span><span class="p">,</span>
    <span class="n">HeartbeatInterval</span><span class="o">:</span> <span class="m">10</span> <span class="o">*</span> <span class="n">time</span><span class="o">.</span><span class="n">Second</span><span class="p">,</span>
    <span class="n">ResponseTimeout</span><span class="o">:</span>   <span class="m">30</span> <span class="o">*</span> <span class="n">time</span><span class="o">.</span><span class="n">Second</span><span class="p">,</span>
<span class="p">})</span>
<span class="k">if</span> <span class="n">err</span> <span class="o">!=</span> <span class="no">nil</span> <span class="p">{</span>
    <span class="n">log</span><span class="o">.</span><span class="n">Fatal</span><span class="p">(</span><span class="n">err</span><span class="p">)</span>
<span class="p">}</span>
<span class="c">// Close upon exiting. Even if the gateway closes the connection, we still have to clean up.</span>
<span class="k">defer</span> <span class="n">client</span><span class="o">.</span><span class="n">Close</span><span class="p">()</span>
</code></pre></div></div>

<p>This is very close to the example given by the library.</p>

<h4 id="which-ip-to-connect-to">Which IP to connect to?</h4>

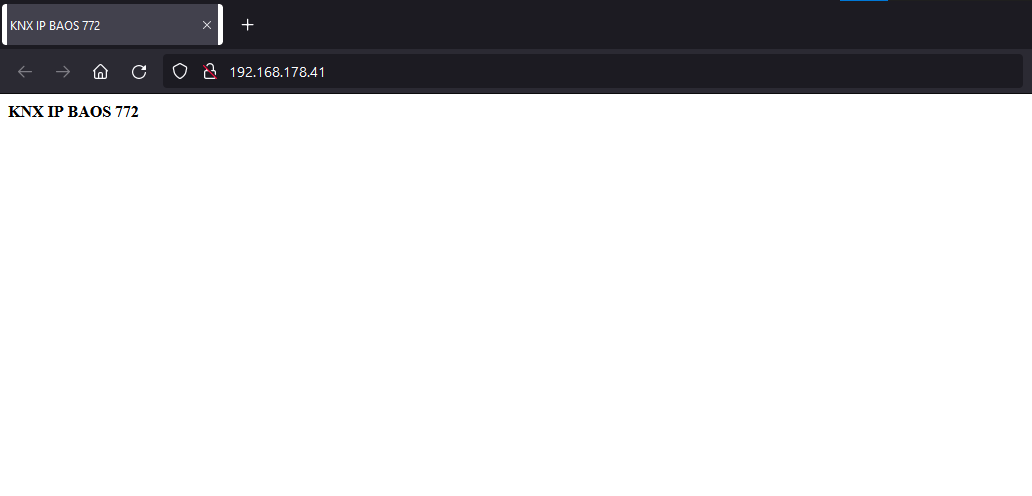
<p>You might wonder which IP and port you need to connect to. The port really <em>should be</em> <code class="language-plaintext highlighter-rouge">3671</code>. For the IP you can look into the network overview of your router (where you see all kinds of IP addresses). Now we search for a device with “BAOS” in the name. In my case, it wasn’t there. It seemed to have gotten a default name from the router. So I had to go through all unknown devices, copy their IP address (e.g. <code class="language-plaintext highlighter-rouge">192.168.178.41</code>) and visit it in a browser (<code class="language-plaintext highlighter-rouge">http://192.168.178.41</code>). At some point, you should find an almost empty page that contains only the name of the BAOS component, like this:</p>

<div class="center-image"><img src="assets/knx/KNX-BAOS-Webpage.png" alt="The web page of the KNX BAOS just shows a description of the model, in this case 'KNX IP BAOS 772'" /></div>

<p>So in my case, the gateway address string in the code (first argument of NewGroupTunnel) should be <code class="language-plaintext highlighter-rouge">192.168.178.41:3671</code>. Let’s start the program and see if it works.</p>

<h4 id="possible-errors">Possible errors</h4>
<p>There are a bunch of error conditions I have faced while developing my own software that I just want to tell you about here. The connection to this gateway is a bit… interesting.</p>

<h5 id="multiple-connections">Multiple connections</h5>
<p>The first thing you should try when the connection doesn’t work is closing ETS (or at least disconnecting it from the KNX system) and anything else that is connected to the KNX system. What I found out, at least about this gateway, is that it seems to only support <strong>exactly one connection</strong> at once. When you connect from your code, you might get an error like <code class="language-plaintext highlighter-rouge">Response timeout reached</code>. ETS4 is a bit more descriptive with the following message (german):</p>

<blockquote>
  <p>Fehler beim Öffnen der Verbindung: Die Schnittstelle konnte nicht geöffnet werden. Der Tunneling-Server ist erreichbar, aber er akzeptiert keine Verbindungen mehr zu diesem Zeitpunkt</p>
</blockquote>

<blockquote>
  <p>Error when opening the connection: The interface could not be opened. The tunneling server is reachable, but it no longer accepts connections at this time</p>
</blockquote>

<p>So basically the solution to this is to only have <strong>one thing</strong> connect to the KNX system at a time. You can’t use your own software and ETS at the same time.</p>

<h5 id="timeout">Timeout</h5>
<p>Another thing to note is that connecting to this BAOS gateway seems to be <em>very</em> slow. The default timeout of 10 seconds of the Go library was often not enough in my case. Normal pings are however answered very quickly, so my guess is that the actual software just does… interesting stuff (aka being slow for <em>some</em> reason).</p>

<p>So anyways, increase the timeout and build a reconnection logic into your program. So your program should hold the connection <em>all the time</em> (because the initial connection takes long, and you don’t want to wait 30 seconds before the light turns on or off). And for that initial connection code, you should add something like an exponential backoff timer to only reconnect after 30 seconds, then a minute, then two, four etc. After an unexpected disconnect the gateway seems to take 30 seconds to a few minutes until it can accept connections again, which can be annoying for debugging. Make sure to always call <code class="language-plaintext highlighter-rouge">client.Close()</code> before stopping your program, else you might need to wait a bit.</p>

<hr />

<h3 id="sending-signals-switching-lights">Sending signals, switching lights</h3>

<p>So now I assume that you have a working, connected KNX client in the code – the very same that we set up in the previous section.</p>

<p>The KNX library now provides the following example code to send <code class="language-plaintext highlighter-rouge">20.5°C</code> to group address <code class="language-plaintext highlighter-rouge">1/2/3</code>.</p>

<div class="language-go highlighter-rouge"><div class="highlight"><pre class="highlight"><code><span class="n">err</span> <span class="o">=</span> <span class="n">client</span><span class="o">.</span><span class="n">Send</span><span class="p">(</span><span class="n">knx</span><span class="o">.</span><span class="n">GroupEvent</span><span class="p">{</span>
    <span class="n">Command</span><span class="o">:</span>     <span class="n">knx</span><span class="o">.</span><span class="n">GroupWrite</span><span class="p">,</span>
    <span class="n">Destination</span><span class="o">:</span> <span class="n">cemi</span><span class="o">.</span><span class="n">NewGroupAddr3</span><span class="p">(</span><span class="m">1</span><span class="p">,</span> <span class="m">2</span><span class="p">,</span> <span class="m">3</span><span class="p">),</span>
    <span class="n">Data</span><span class="o">:</span>        <span class="n">dpt</span><span class="o">.</span><span class="n">DPT_9001</span><span class="p">(</span><span class="m">20.5</span><span class="p">)</span><span class="o">.</span><span class="n">Pack</span><span class="p">(),</span>
<span class="p">})</span>
</code></pre></div></div>

<p>We of course want to adapt this to a light switch.</p>

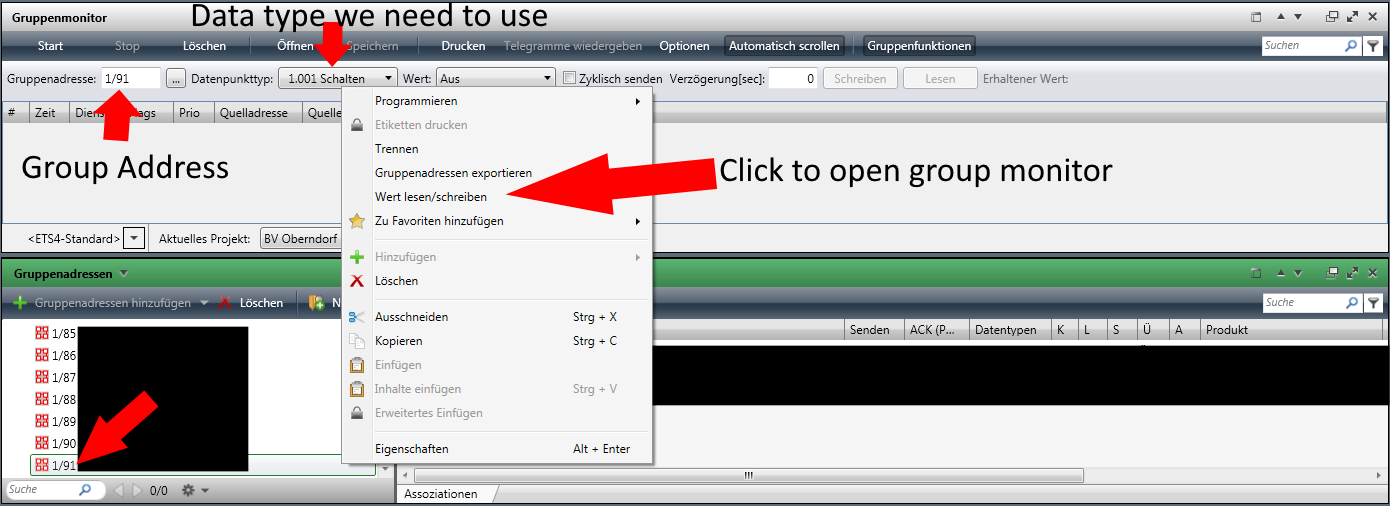
<p>So in the ETS4 software there’s a tab for “group addresses”, and when you right-click on one, you can read/write a value:</p>

<div class="center-image"><img src="assets/knx/KNX-Group-Addresses.png" alt="The 'group address' window shows the address we want to write to, so we click 'read/write value' and then read the data point type from the group monitor window" /></div>

<p>In the “group addresses” window, we select the light we want to switch for now (for debugging purposes). We right-click it, and ETS will open the “group monitor” window, which shows the group address. The type of data we need to send should be preconfigured.</p>

<p>Note that there are (at least) two formats for addresses: one with two numbers (<code class="language-plaintext highlighter-rouge">1/2</code>) and one with three numbers (<code class="language-plaintext highlighter-rouge">1/2/3</code>). Just make sure to use exactly the format that ETS uses.</p>

<p>So when we revisit the send snippet above, we can now write the following for a light switch:</p>

<div class="language-go highlighter-rouge"><div class="highlight"><pre class="highlight"><code><span class="n">err</span> <span class="o">=</span> <span class="n">client</span><span class="o">.</span><span class="n">Send</span><span class="p">(</span><span class="n">knx</span><span class="o">.</span><span class="n">GroupEvent</span><span class="p">{</span>
    <span class="n">Command</span><span class="o">:</span>     <span class="n">knx</span><span class="o">.</span><span class="n">GroupWrite</span><span class="p">,</span>
    <span class="n">Destination</span><span class="o">:</span> <span class="n">cemi</span><span class="o">.</span><span class="n">NewGroupAddr2</span><span class="p">(</span><span class="m">1</span><span class="p">,</span> <span class="m">91</span><span class="p">),</span>
    <span class="n">Data</span><span class="o">:</span>        <span class="n">dpt</span><span class="o">.</span><span class="n">DPT_1001</span><span class="p">(</span><span class="no">true</span><span class="p">)</span><span class="o">.</span><span class="n">Pack</span><span class="p">(),</span>
    <span class="n">Source</span><span class="o">:</span>      <span class="n">cemi</span><span class="o">.</span><span class="n">NewIndividualAddr3</span><span class="p">(</span><span class="m">15</span><span class="p">,</span> <span class="m">15</span><span class="p">,</span> <span class="m">15</span><span class="p">),</span>
<span class="p">})</span>
</code></pre></div></div>

<ul>
  <li>The <code class="language-plaintext highlighter-rouge">Command</code> property is obvious: we want to send something, so we write our signal to the connection.</li>
  <li>The <code class="language-plaintext highlighter-rouge">Destination</code> is the group address we want to send to. Since <code class="language-plaintext highlighter-rouge">1/91</code> has two numbers, we choose the <code class="language-plaintext highlighter-rouge">NewGroupAddr2</code> constructor (instead of <code class="language-plaintext highlighter-rouge">NewGroupAddr3</code> for 3 numbers)</li>
  <li>For <code class="language-plaintext highlighter-rouge">Data</code> it’s important that the data format is correct. In the screenshot we can see “1.001 Schalten” as data type, so now we use the “<strong>D</strong>ata <strong>P</strong>oint <strong>T</strong>ype <code class="language-plaintext highlighter-rouge">1001</code>”, aka <code class="language-plaintext highlighter-rouge">DPT_1001</code>. Here <code class="language-plaintext highlighter-rouge">true</code> stands for on; <code class="language-plaintext highlighter-rouge">false</code> would turn the light off</li>
  <li>We can also add a <code class="language-plaintext highlighter-rouge">Source</code> address, which identifies who sent the signal. I’m not 100% sure if the signal is accepted without a source, but you can just add it.</li>
</ul>

<p>And that’s basically it. This now allows you to turn the light on and off. When changing the destination address, you should be able to switch any light connected to the KNX system.</p>

<h5 id="some-things-to-note">Some things to note</h5>
<p>I will be honest, when I started playing with the system I was kind of afraid that I could break it in some way. So here are some tips in Q&amp;A style:</p>

<p>Can I break something in the system by turning on a light that is already on?</p>
<ul>
  <li>No. When you send an “on” signal (aka <code class="language-plaintext highlighter-rouge">dpt.DPT_1001(true)</code>), nothing happens when the light is already on.</li>
</ul>

<p>How can I toggle a light without directly sending the new state it should have?</p>
<ul>
  <li>It doesn’t seem to be possible to just toggle a light. In order to toggle a light, your application needs to read the light state, then invert it. In my case, sending a <code class="language-plaintext highlighter-rouge">knx.GroupRead</code> command didn’t really do <em>anything</em> and also never returned any data (also in ETS, so reading doesn’t seem to work at all). The solution to this is to listen to inbound messages (basically you can listen to <em>all events</em> sent over KNX), and then you have to keep a mapping of light addresses to their current state. And now when you want to toggle a light, you basically invert the last state you received about that light. So yeah, rather annoying but possible to do.</li>
</ul>

<hr />

<h2 id="interesting-applications">Interesting applications</h2>
<p>Now that we know how to switch lights (and shutters, and basically anything else in the system) I want to tell you about a few projects you can do with that knowledge.</p>

<h3 id="home-software">Home software</h3>
<p>The most obvious thing is to just make a website where you can switch lights.</p>

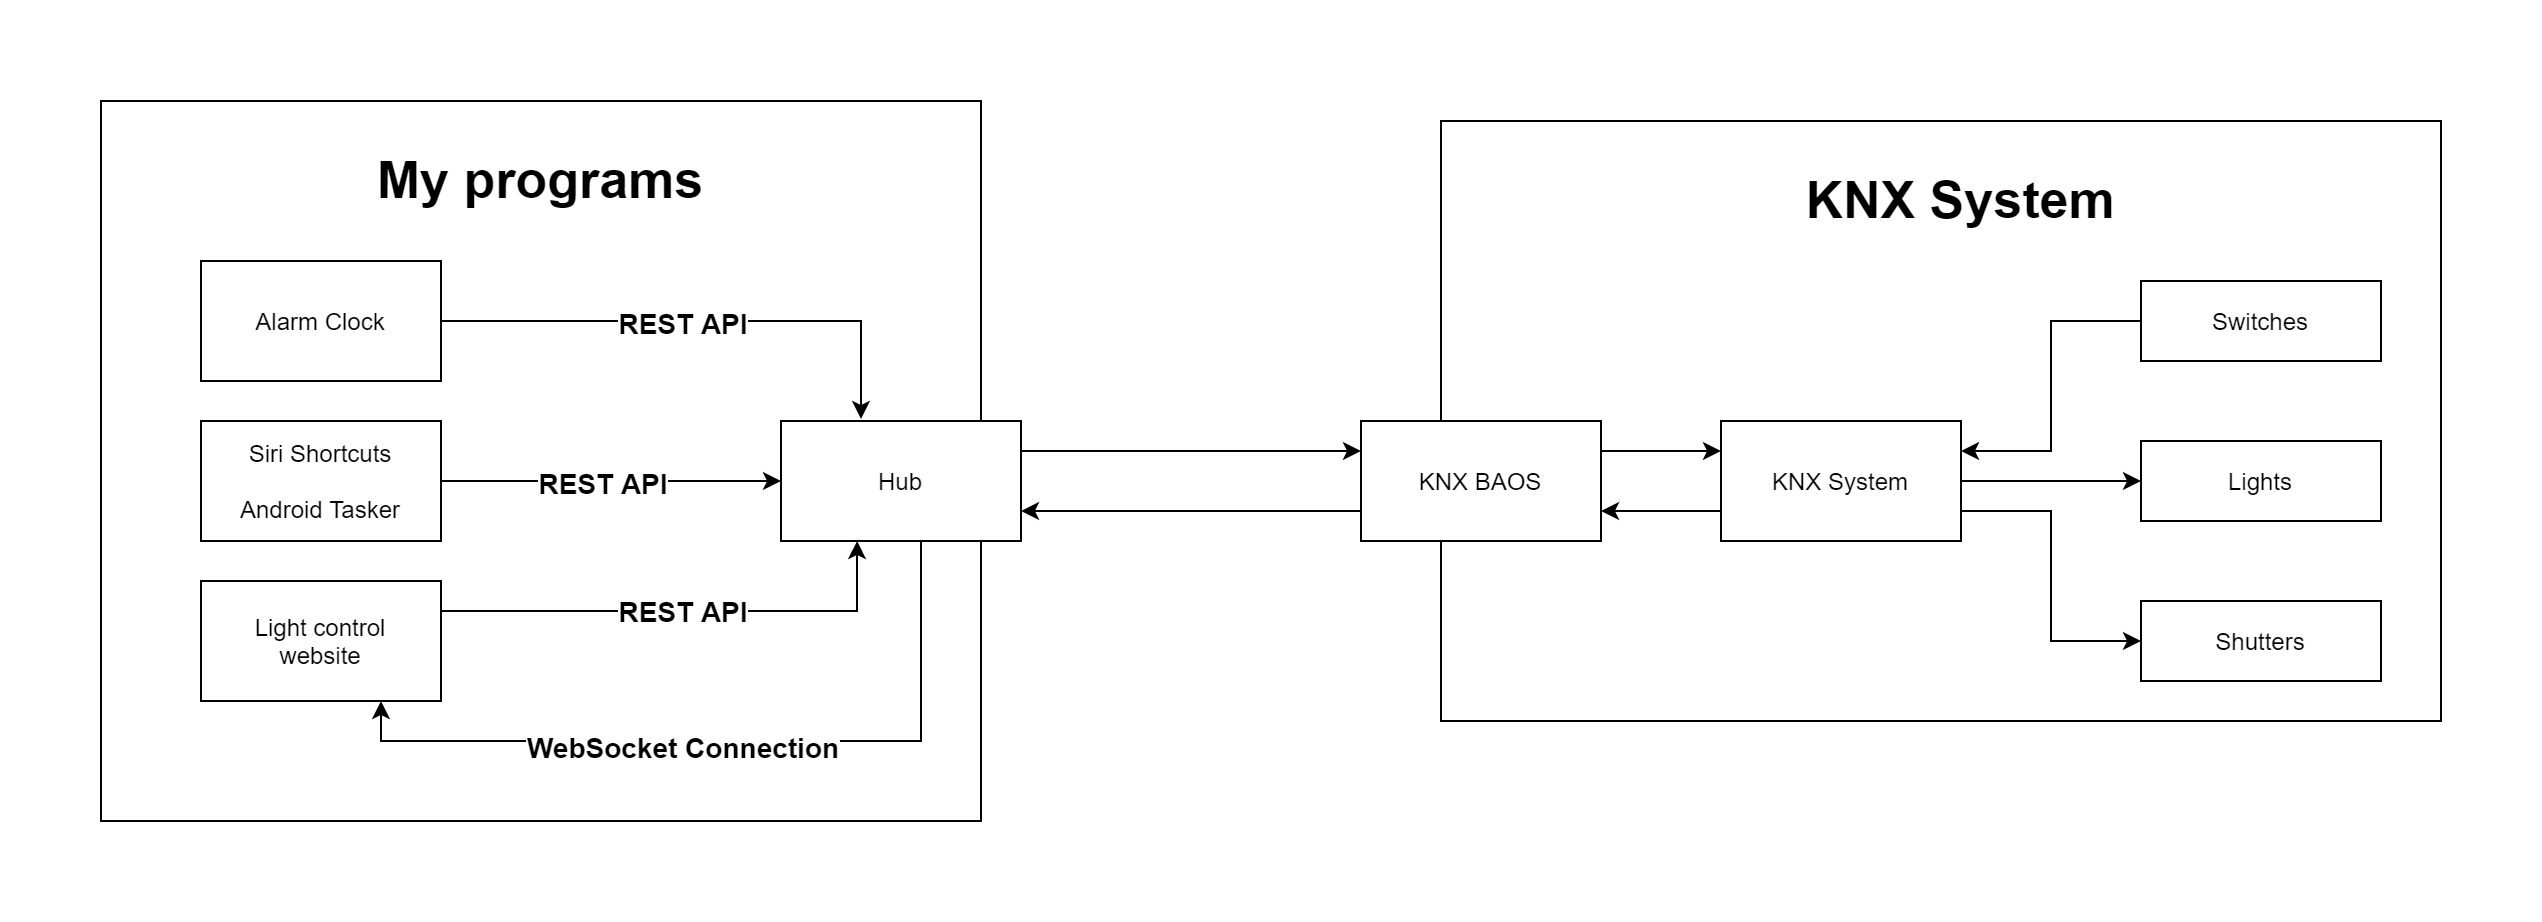
<p>Since the BAOS only allowed one connection, I created a “Hub” software that other software can send commands to. So it basically works like this:</p>

<div class="center-image"><img src="assets/knx/KNX-Home-Setup.png" alt="This diagram shows the setup of how my programs interact with the hub, which connects to the KNX BAOS system" /></div>

<p>So this allows any software to just connect to the hub to receive live events (via a WebSocket connection) if it needs to. Other software can just use the REST API, which means that it can send really simple post requests to switch lights without having to know all the KNX stuff. This is especially useful for automation apps like “Siri Shortcuts” or the Android equivalent “Tasker” that allow you to send simple HTTP requests.</p>

<p>The hub runs on a Raspberry Pi and really doesn’t need much resources. It just needs to read which lights are switched by the KNX system and update its internal state accordingly. When a light switch request comes in, it inverts the last known state of the light and sends that to KNX. That way, a light that was on is switched off and vice-versa. So now let’s use the hub for real.</p>

<h3 id="a-light-switch-on-your-phone">A light switch on your phone</h3>
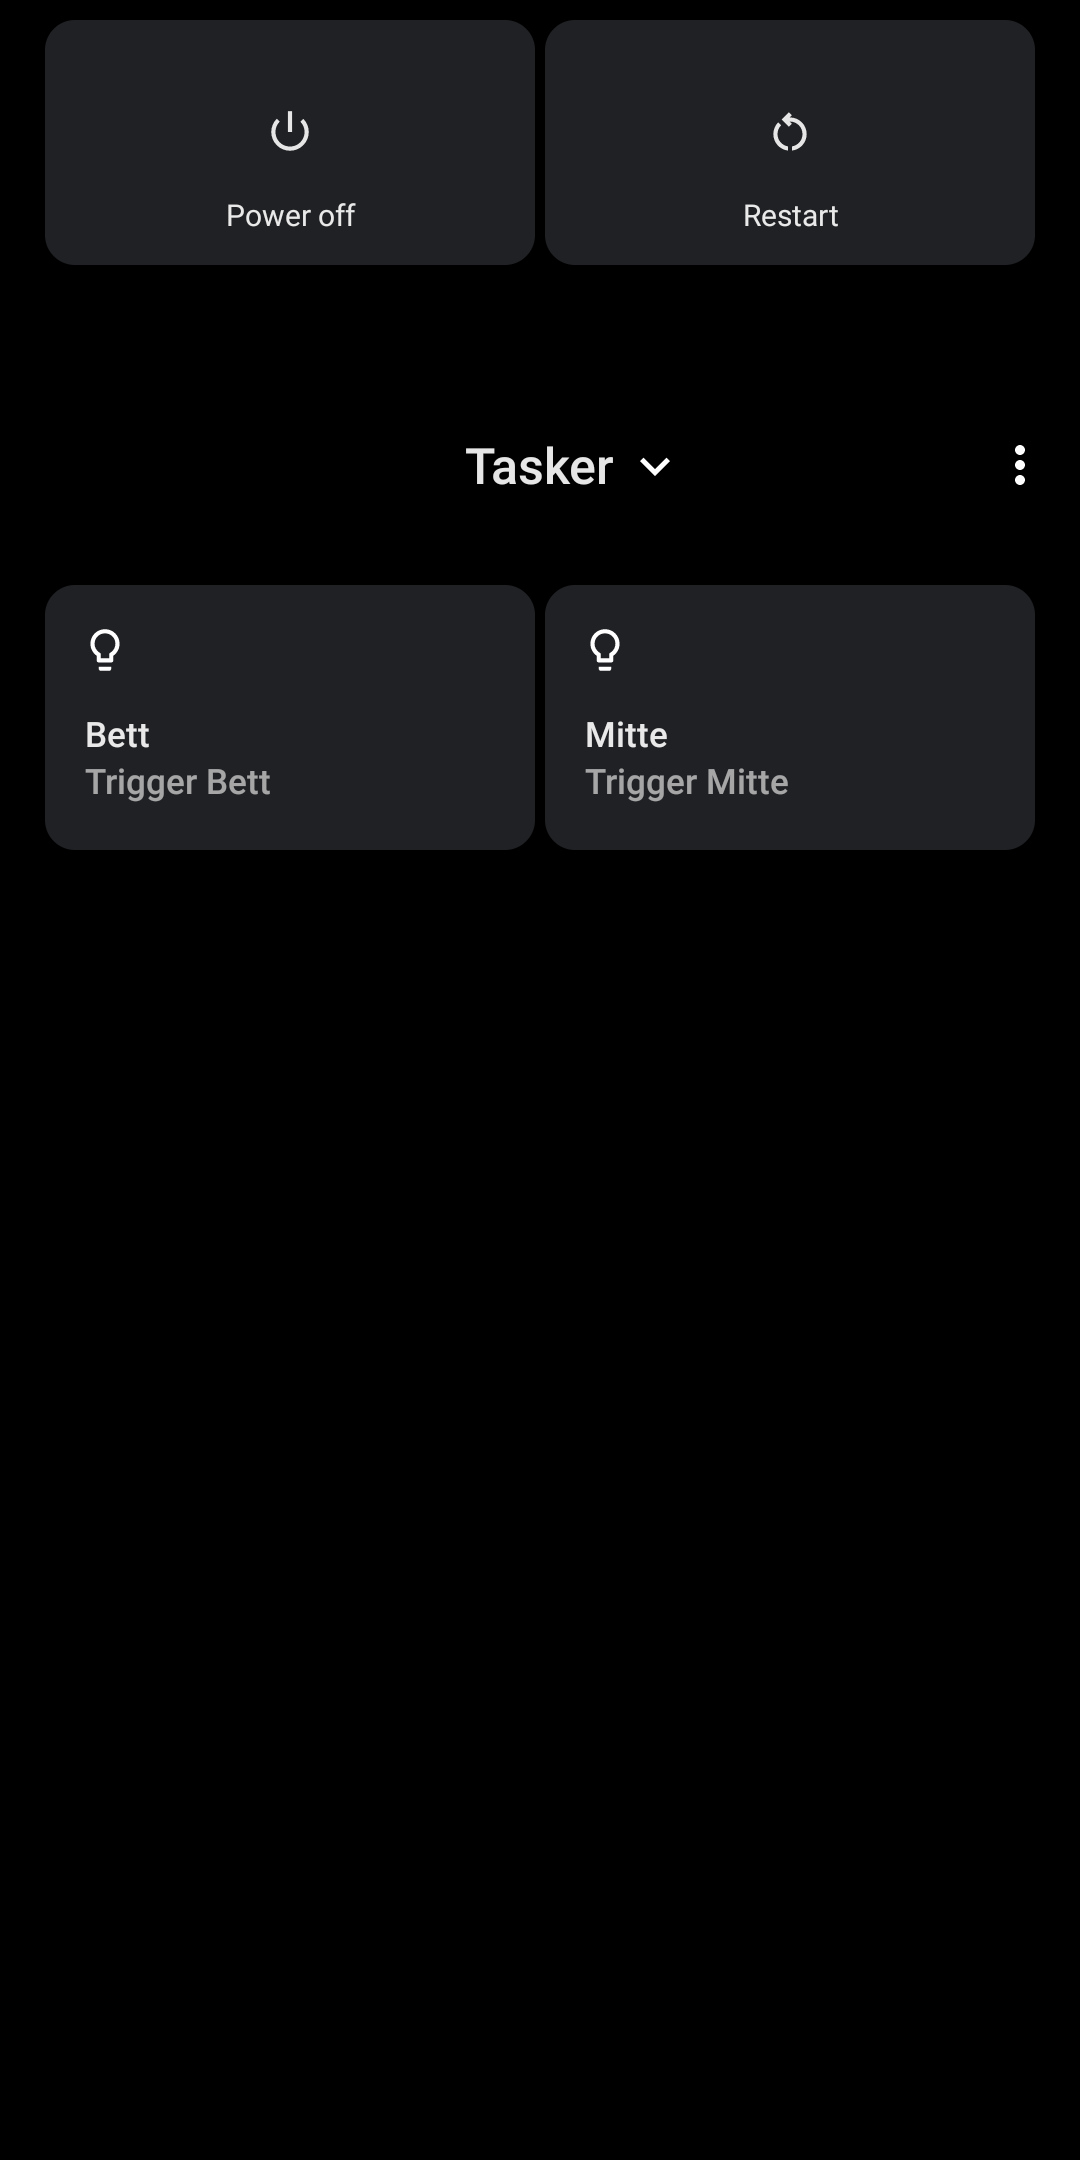
<p>On my Android phone, I use <a href="https://play.google.com/store/apps/details?id=net.dinglisch.android.taskerm">Tasker</a> to send a HTTP request to the hub whenever I press a widget on my phone. With the introduction of the Android 11 power menu, this got even more interesting:</p>

<div class="center-image"><img src="assets/knx/Android11-PowerMenu.png" alt="The Android 11 power menu shows light switch controls added using Tasker" /></div>

<p>Basically when I tap the button, Tasker sends a request to the hub (this request includes the group address of the target light). It checks if the light in question is on or off, and sends a request with the inverted state to the KNX BAOS (as described in the section about sending signals).</p>

<h3 id="a-light-switch-website">A light switch website</h3>
<p>Since we can read live data from the hub, we can create a website that displays the current state of some light switches (e.g. by room). This site should of course also allow switching the lights.</p>

<p>And here’s what I came up with for my room:</p>

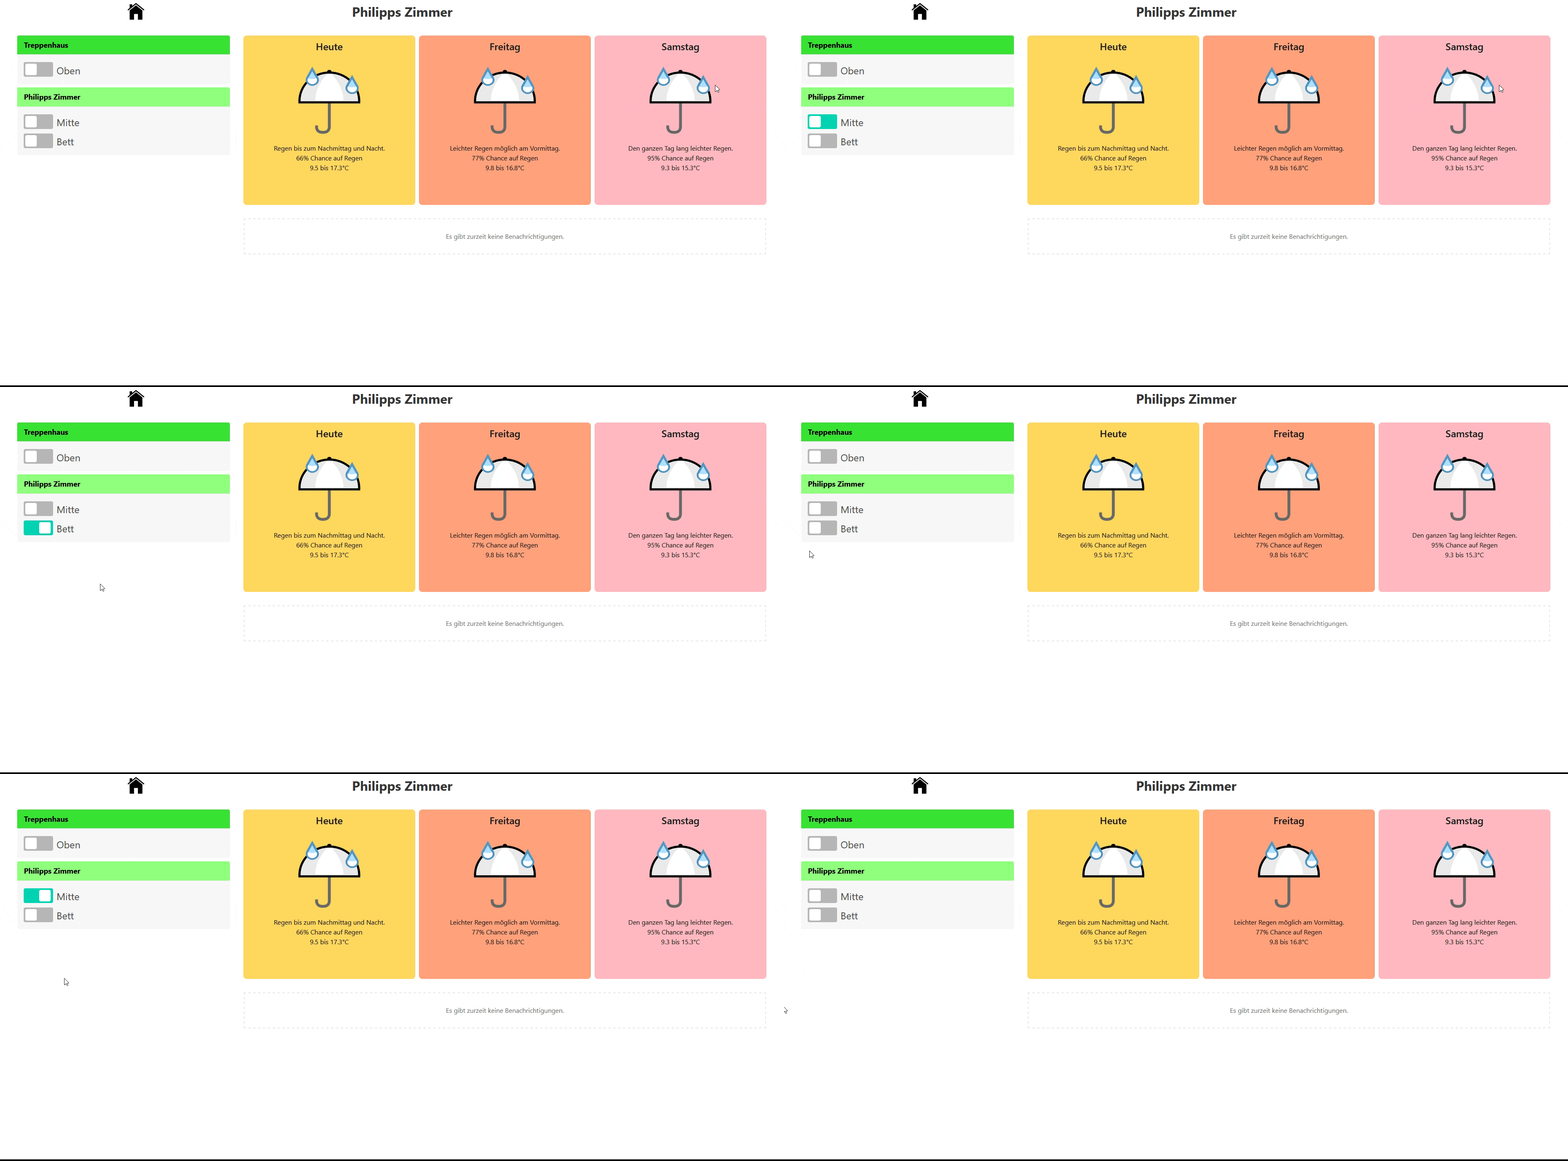
<div class="center-image"><img src="assets/knx/home-website.gif" alt="A demo of my 'home' website that shows the light switches for my room and the current weather. It is possible to switch the switches from the site" /></div>

<p>The buttons switch automatically when the KNX system receives a switch event (either from physical light switches or from the hub). And it is of course also possible to switch the light using the switches on the website directly. I can’t tell you how surreal of a feeling it is when you switch a physical light switch and the website updates within milliseconds; it’s just cool to see.</p>

<h3 id="alarm-clock">Alarm clock</h3>
<p>Another application of automatic light switching – as mentioned in the intro of this article – is an alarm clock. It really helps you wake up when the light is already on – there’s no chance to fall sleep again after that.</p>

<p>The most important part is calculating when you need to wake up (e.g. depending on an online calendar) and adding a fallback wakeup time in case the online source isn’t available for some reason.</p>

<hr />

<h2 id="conclusion">Conclusion</h2>
<p>In general it can be said that the KNX system is kind of annoying to use. But once you figure out the basics and make them work in your program, then it’s rather easy to apply the data gained from it (e.g. live switch events) to other software like the website.</p>

<p>I hope this article helped you in the quest of programmatically automating lights in your home and might have given you one or two ideas on what it could be useful for. If you have any questions please feel free to reach out either on GitHub (e.g. via an issue on my <a href="https://github.com/xarantolus/blog">blog repository</a>) or via an e-mail to <span id="mail-span"></span><script>document.getElementById('mail-span').innerText = atob('eGFyYW50b2x1c+RwbS5tZQ==').replace('ä', String.fromCharCode(8*8))</script><noscript>[not available without JavaScript]</noscript>.</p>

<p>Thanks for reading!</p>]]></content><author><name>xarantolus</name><email>x@010.one</email></author><summary type="html"><![CDATA[Interacting with a KNX system isn't always easy. This article shows how to write programs that switch lights and why you might want to do that. It also shows some demos of programs I use that interact with KNX.]]></summary></entry><entry><title type="html">How to tap the Android screen from the underlying Linux system</title><link href="https://blog.010.one/how-to-tap-the-android-screen-from-the-underlying-linux-system" rel="alternate" type="text/html" title="How to tap the Android screen from the underlying Linux system" /><published>2021-05-18T00:00:00+00:00</published><updated>2021-05-18T00:00:00+00:00</updated><id>https://blog.010.one/how-to-tap-the-android-screen-from-the-underlying-linux-system</id><content type="html" xml:base="https://blog.010.one/how-to-tap-the-android-screen-from-the-underlying-linux-system"><![CDATA[<p>In recent years phone screens seem to only have gotten bigger. This is great because it allows you to see more on your screen, but it also has some drawbacks. One of them has been very annoying to me: I can no longer reach buttons at the top left of the screen in a comfortable way.</p>

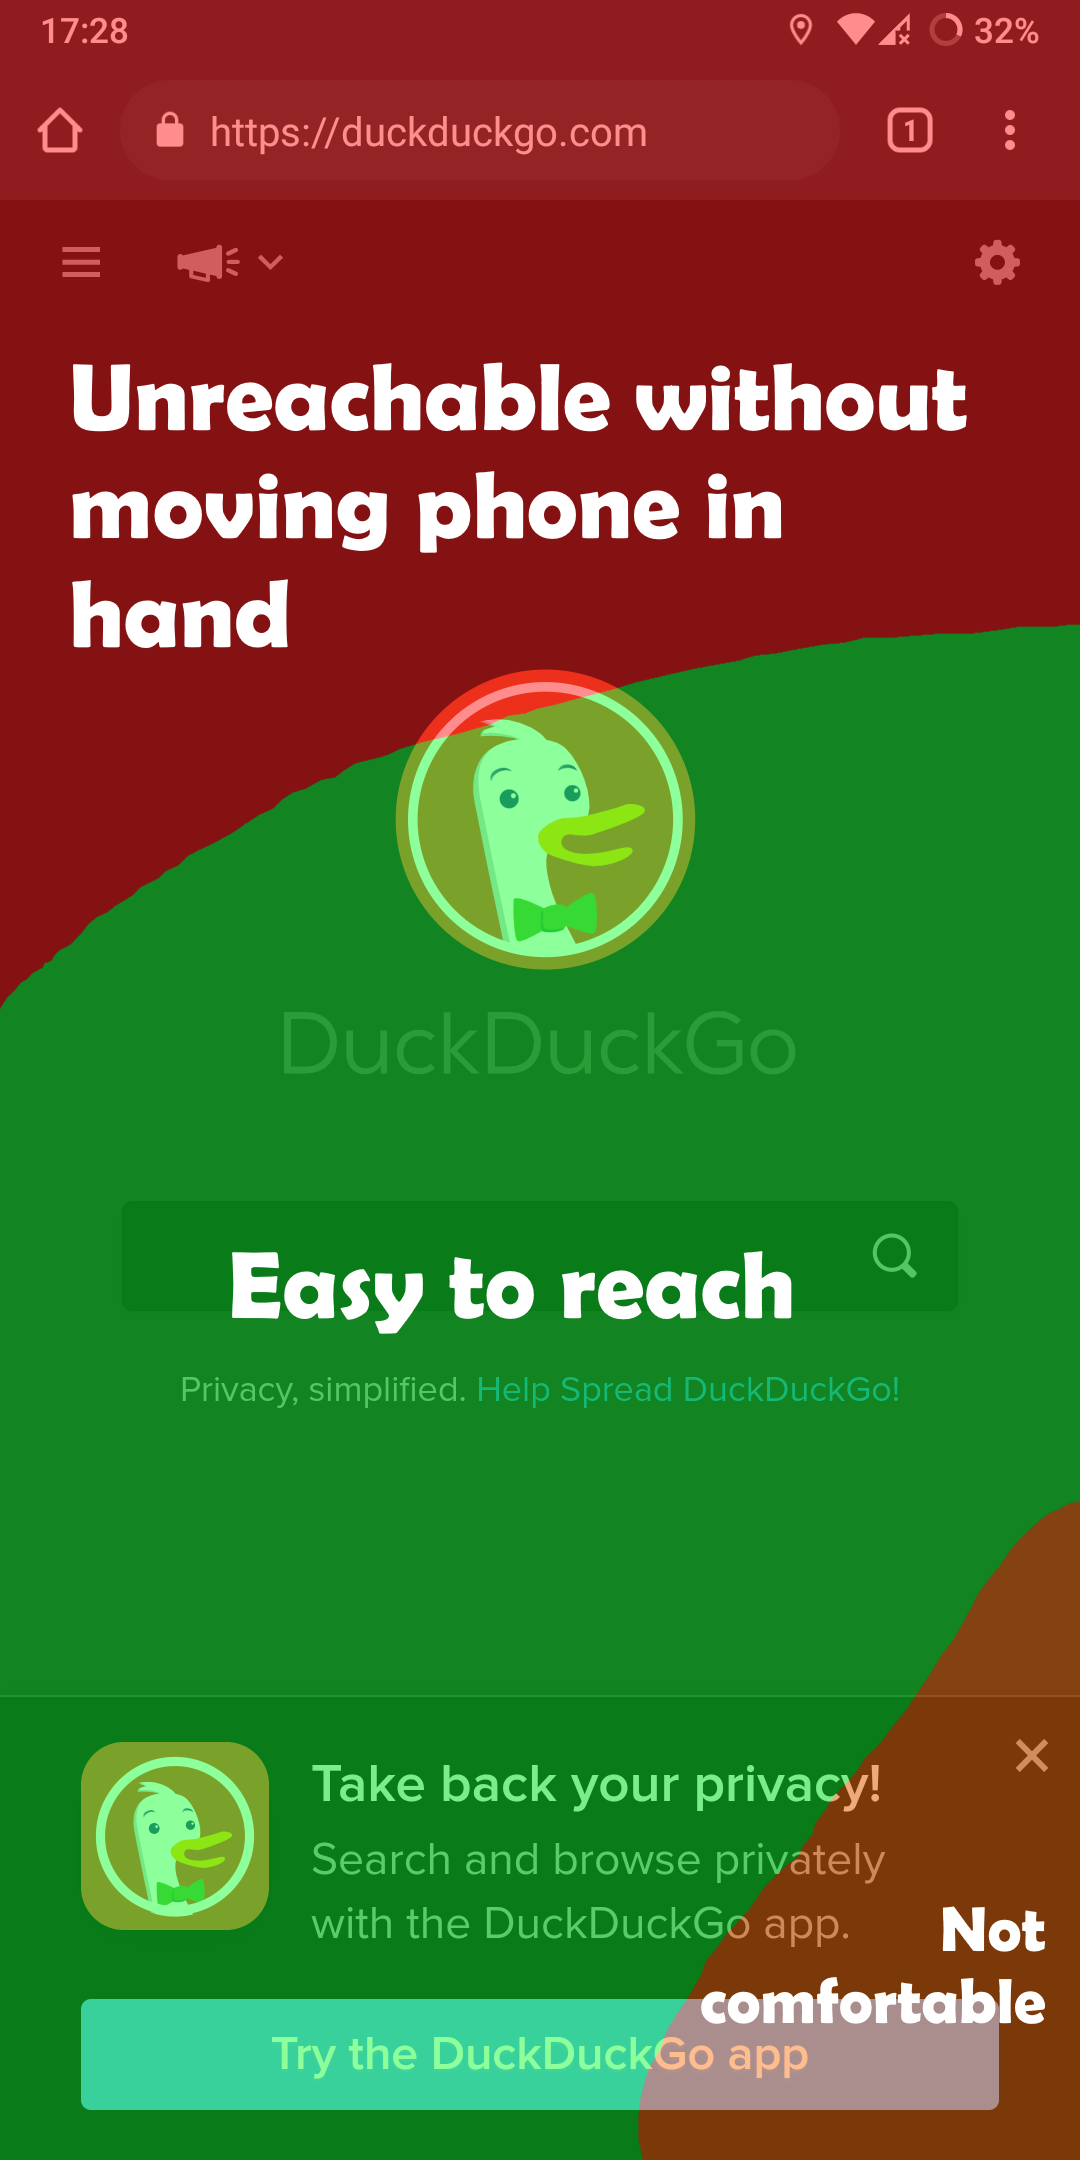
<p>In a way, I would divide the screen in three areas:</p>
<ul>
  <li><strong>Easy to reach</strong>: the area can be reached with the thumb while holding the phone.</li>
  <li><strong>Not comfortable</strong>: you <em>can</em> reach the area, but it’s not as comfortable as the previously mentioned one.</li>
  <li><strong>Unreachable</strong>: this area is not in the reach of my thumb without repositioning my hand at the edge of the phone.</li>
</ul>

<div class="center-image" width="2160" height="1080"><img src="assets/taptap/Phone-Reachable-Areas.png" alt="Here is a screenshot with an overlay that shows which areas are easy to reach with a thumb" /></div>

<p>So to me the most annoying buttons are those at the top left. While those on the top right can still be reached with a little effort, the ones in the top left corner require more effort.</p>

<h3 id="so-how-do-we-solve-this-problem">So how do we solve this problem?</h3>
<p>The best way I came up with to solve this problem was a simple idea: What if there was a way to tap the top left corner without leaving the “Easy to reach” category?</p>

<p>My phone has a fingerprint scanner at the back that is very easy to reach. This scanner also doesn’t have any functionality when the phone is unlocked.</p>

<h3 id="detecting-a-finger-on-the-sensor">Detecting a finger on the sensor</h3>
<p>So I took a look at the Android system log and found the following lines when putting the finger on and off the sensor:</p>

<div class="language-text highlighter-rouge"><div class="highlight"><pre class="highlight"><code>fpc_fingerprint_hal: report_input_event - Reporting event type: 1, code: 96, value:1
fpc_fingerprint_hal: report_input_event - Reporting event type: 1, code: 96, value:0
</code></pre></div></div>

<p>The only relevant difference between these lines is the number at the end – <code class="language-plaintext highlighter-rouge">1</code> for “finger down”, <code class="language-plaintext highlighter-rouge">0</code> for “finger up”.</p>

<p>So that was easy – just write a program that scans the <code class="language-plaintext highlighter-rouge">logcat</code> output, detects these lines and then runs the <code class="language-plaintext highlighter-rouge">input tap x y</code> shell command to tap a specific point. Right?</p>

<p>No.</p>

<h3 id="its-so-slow">It’s so slow</h3>
<p>The input command seemed very slow to me. It took quite some time from tapping the sensor to a reaction to the click. While testing it appeared to take at least 300ms, often worse with about 400ms.</p>

<p>According to a lot of <a href="https://stackoverflow.com/questions/536300/what-is-the-shortest-perceivable-application-response-delay">anecdotal evidence</a>, actions that take 100ms or less are perceived as instant. So this command definitely fails all expectations of “instant” (it was probably not designed to be fast, anyway). But why is that?</p>

<h3 id="the-input-command">The “input” command</h3>
<p>Android comes with a lot of different commands in <code class="language-plaintext highlighter-rouge">/system/bin</code>. Most of them are to be expected in a typical Linux environment (like <code class="language-plaintext highlighter-rouge">tail</code>, <code class="language-plaintext highlighter-rouge">cat</code> etc.) and some of them are specific to Android.</p>

<p>The <code class="language-plaintext highlighter-rouge">input</code> command, to my surprise, was just a shell script:</p>

<div class="language-sh highlighter-rouge"><div class="highlight"><pre class="highlight"><code><span class="c">#!/system/bin/sh</span>
<span class="c"># Script to start "input" on the device, which has a very rudimentary</span>
<span class="c"># shell.</span>
<span class="c">#</span>
<span class="nv">base</span><span class="o">=</span>/system
<span class="nb">export </span><span class="nv">CLASSPATH</span><span class="o">=</span><span class="nv">$base</span>/framework/input.jar
<span class="nb">exec </span>app_process <span class="nv">$base</span>/bin com.android.commands.input.Input <span class="s2">"</span><span class="nv">$@</span><span class="s2">"</span>
</code></pre></div></div>

<p>If I read that correctly, it basically starts a <a href="https://android.googlesource.com/platform/frameworks/base/+/master/cmds/input/src/com/android/commands/input/Input.java">Java program</a> that can simulate a tap. There are also other actions it can do but for this post I don’t care.</p>

<h2 id="reducing-the-delay">Reducing the delay</h2>
<p>One method to not have the long, noticeable delay is – quite simply – not relying on the <code class="language-plaintext highlighter-rouge">input</code> command. It just writes some data, that shouldn’t be too hard to copy. So instead of starting a script that starts a program that writes a small piece of data, we can just write it ourselves.</p>

<p>But <strong>what</strong> should we write and <strong>where</strong> should the data be written?</p>

<p>I don’t know exactly why, but I never really looked at <a href="https://source.android.com/devices/input/touch-devices">the documentation</a> (also <a href="https://www.kernel.org/doc/Documentation/input/multi-touch-protocol.txt">this</a> now makes a lot more sense) and started reverse-engineering this… open source protocol. Yea… anyway.</p>

<p>The first step when trying to reproduce a behavior is watching it. So how can we watch taps on the screen as they happen?</p>

<p>The <a href="https://source.android.com/devices/input/getevent"><code class="language-plaintext highlighter-rouge">getevent</code></a> utility allows us to watch certain events happen in real time. It also makes it easy to list device files associated with those events.</p>

<p>Using <code class="language-plaintext highlighter-rouge">getevent -pl</code> (in a root shell on the phone) we can get a nice overview of devices, their events and device file paths:</p>

<div class="language-plaintext highlighter-rouge"><div class="highlight"><pre class="highlight"><code>chiron:/ $ getevent -pl
add device 1: /dev/input/event6
name:     "msm8998-tasha-snd-card Button Jack"
events:
    KEY (0001): KEY_VOLUMEDOWN        KEY_VOLUMEUP          KEY_MEDIA             BTN_3
                BTN_4                 BTN_5
input props:
    INPUT_PROP_ACCELEROMETER
add device 2: /dev/input/event5
name:     "msm8998-tasha-snd-card Headset Jack"
events:
    SW  (0005): SW_HEADPHONE_INSERT   SW_MICROPHONE_INSERT  SW_LINEOUT_INSERT     SW_JACK_PHYSICAL_INS
                SW_PEN_INSERTED       0010                  0011                  0012
input props:
    &lt;none&gt;
add device 3: /dev/input/event4
name:     "uinput-fpc"
events:
    KEY (0001): KEY_KPENTER           KEY_UP                KEY_LEFT              KEY_RIGHT
                KEY_DOWN              BTN_GAMEPAD           BTN_EAST              BTN_C
                BTN_NORTH             BTN_WEST
input props:
    &lt;none&gt;
add device 4: /dev/input/event3
name:     "gpio-keys"
events:
    KEY (0001): KEY_VOLUMEUP
    SW  (0005): SW_LID
input props:
    &lt;none&gt;
add device 5: /dev/input/event0
name:     "qpnp_pon"
events:
    KEY (0001): KEY_VOLUMEDOWN        KEY_POWER
input props:
    &lt;none&gt;
add device 6: /dev/input/event2
name:     "uinput-goodix"
events:
    KEY (0001): KEY_HOME
input props:
    &lt;none&gt;
add device 7: /dev/input/event1
name:     "synaptics_dsx"
events:
    KEY (0001): KEY_WAKEUP            BTN_TOOL_FINGER       BTN_TOUCH
    ABS (0003): ABS_X                 : value 0, min 0, max 1079, fuzz 0, flat 0, resolution 0
                ABS_Y                 : value 0, min 0, max 2159, fuzz 0, flat 0, resolution 0
                ABS_MT_SLOT           : value 9, min 0, max 9, fuzz 0, flat 0, resolution 0
                ABS_MT_TOUCH_MAJOR    : value 0, min 0, max 255, fuzz 0, flat 0, resolution 0
                ABS_MT_TOUCH_MINOR    : value 0, min 0, max 255, fuzz 0, flat 0, resolution 0
                ABS_MT_POSITION_X     : value 0, min 0, max 1079, fuzz 0, flat 0, resolution 0
                ABS_MT_POSITION_Y     : value 0, min 0, max 2159, fuzz 0, flat 0, resolution 0
                ABS_MT_TRACKING_ID    : value 0, min 0, max 65535, fuzz 0, flat 0, resolution 0
input props:
    INPUT_PROP_DIRECT
</code></pre></div></div>

<p>It looks confusing at first, but especially the last device is interesting: It has all kinds of events that are associated with a multitouch device. That’s our screen. So now we know <strong>where</strong> to write data, the device file <code class="language-plaintext highlighter-rouge">/dev/input/event1</code>.</p>

<p>The question <strong>what</strong> we should write can be answered by watching the <code class="language-plaintext highlighter-rouge">getevent -l</code> output:</p>

<div class="language-plaintext highlighter-rouge"><div class="highlight"><pre class="highlight"><code>/dev/input/event1: EV_ABS       ABS_MT_TRACKING_ID   0000504c
/dev/input/event1: EV_KEY       BTN_TOUCH            DOWN
/dev/input/event1: EV_KEY       BTN_TOOL_FINGER      DOWN
/dev/input/event1: EV_ABS       ABS_MT_POSITION_X    00000037
/dev/input/event1: EV_ABS       ABS_MT_POSITION_Y    0000008d
/dev/input/event1: EV_SYN       SYN_REPORT           00000000
/dev/input/event1: EV_ABS       ABS_MT_TOUCH_MAJOR   00000006
/dev/input/event1: EV_SYN       SYN_REPORT           00000000
/dev/input/event1: EV_ABS       ABS_MT_TRACKING_ID   ffffffff
/dev/input/event1: EV_KEY       BTN_TOUCH            UP
/dev/input/event1: EV_KEY       BTN_TOOL_FINGER      UP
/dev/input/event1: EV_SYN       SYN_REPORT           00000000
</code></pre></div></div>

<p>This is the output when doing a single tap in the top left corner of the display. Note that the numbers next to <code class="language-plaintext highlighter-rouge">ABS_MT_POSITION_{X,Y}</code> are the coordinates I just tapped. So the question is: how do we translate this? Not at all, we just remove the <code class="language-plaintext highlighter-rouge">-l</code> (“label event types and names in plain text”) option to get a more “raw” data stream:</p>

<div class="language-plaintext highlighter-rouge"><div class="highlight"><pre class="highlight"><code>/dev/input/event1: 0003 0039 0000504d        # ABS_MT_TRACKING_ID  
/dev/input/event1: 0001 014a 00000001        # BTN_TOUCH           
/dev/input/event1: 0001 0145 00000001        # BTN_TOOL_FINGER     
/dev/input/event1: 0003 0035 00000037        # ABS_MT_POSITION_X   
/dev/input/event1: 0003 0036 0000008d        # ABS_MT_POSITION_Y   
/dev/input/event1: 0000 0000 00000000        # SYN_REPORT          
/dev/input/event1: 0003 0030 00000006        # ABS_MT_TOUCH_MAJOR  
/dev/input/event1: 0000 0000 00000000        # SYN_REPORT          
/dev/input/event1: 0003 0039 ffffffff        # ABS_MT_TRACKING_ID  
/dev/input/event1: 0001 014a 00000000        # BTN_TOUCH           
/dev/input/event1: 0001 0145 00000000        # BTN_TOOL_FINGER     
/dev/input/event1: 0000 0000 00000000        # SYN_REPORT          
</code></pre></div></div>

<p>OK, so that is the data. And we know where to write it. But still… how?
Let’s take a look at the source code of the <a href="https://android.googlesource.com/platform/system/core/+/froyo-release/toolbox/sendevent.c"><code class="language-plaintext highlighter-rouge">sendevent</code></a> command. It seems to basically be a lower-level version of the <code class="language-plaintext highlighter-rouge">input</code> command (not really, but still kind of).</p>

<p>The most interesting part is the <code class="language-plaintext highlighter-rouge">input_event</code> struct, which is filled with data and then written to a device file:</p>

<div class="language-c highlighter-rouge"><div class="highlight"><pre class="highlight"><code><span class="k">struct</span> <span class="n">input_event</span> <span class="p">{</span>
	<span class="k">struct</span> <span class="n">timeval</span> <span class="n">time</span><span class="p">;</span>
	<span class="n">__u16</span> <span class="n">type</span><span class="p">;</span>
	<span class="n">__u16</span> <span class="n">code</span><span class="p">;</span>
	<span class="n">__s32</span> <span class="n">value</span><span class="p">;</span>
<span class="p">};</span>
</code></pre></div></div>

<p>So before we had three columns with numbers in our output, and now we have three unsigned integers we want to fill with data: <code class="language-plaintext highlighter-rouge">type</code>, <code class="language-plaintext highlighter-rouge">code</code> and <code class="language-plaintext highlighter-rouge">value</code>. The <code class="language-plaintext highlighter-rouge">getevent</code> command outputs hex numbers, so we have to make sure we don’t accidentally use the wrong number format when specifying them in a program (definitely never happened to me…sure ;)).</p>

<h3 id="putting-it-all-together">Putting it all together</h3>
<p>Now all we have to do is write the twelve events we observed previously in sequence to the device file and then test the program.</p>

<p>While implementing this is possible in any language, I chose <a href="https://golang.org/">Go</a> for the task because of the ability to easily cross-compile from Windows to Arm64 Android. It also made it extra easy to define the events needed for a single tap:</p>

<div class="language-go highlighter-rouge"><div class="highlight"><pre class="highlight"><code><span class="c">// Define the input_event struct, but in Go</span>
<span class="k">type</span> <span class="n">InputEvent</span> <span class="k">struct</span> <span class="p">{</span>
	<span class="n">Time</span>  <span class="n">syscall</span><span class="o">.</span><span class="n">Timeval</span>
	<span class="n">Type</span>  <span class="n">EventType</span>
	<span class="n">Code</span>  <span class="n">EventCode</span>
	<span class="n">Value</span> <span class="kt">uint32</span>
<span class="p">}</span>

<span class="c">// Some const definitions, names are from the getevent output</span>
<span class="k">type</span> <span class="n">EventType</span> <span class="kt">uint16</span>

<span class="k">const</span> <span class="p">(</span>
	<span class="n">EV_ABS</span> <span class="n">EventType</span> <span class="o">=</span> <span class="m">0x0003</span>
	<span class="n">EV_KEY</span> <span class="n">EventType</span> <span class="o">=</span> <span class="m">0x0001</span>
	<span class="n">EV_SYN</span> <span class="n">EventType</span> <span class="o">=</span> <span class="m">0x0000</span>
<span class="p">)</span>

<span class="c">// Known event codes for a touch sequence</span>
<span class="k">type</span> <span class="n">EventCode</span> <span class="kt">uint16</span>

<span class="k">const</span> <span class="p">(</span>
	<span class="n">ABS_MT_TRACKING_ID</span> <span class="n">EventCode</span> <span class="o">=</span> <span class="m">0x0039</span>
	<span class="n">BTN_TOUCH</span>          <span class="n">EventCode</span> <span class="o">=</span> <span class="m">0x014a</span>
	<span class="n">BTN_TOOL_FINGER</span>    <span class="n">EventCode</span> <span class="o">=</span> <span class="m">0x0145</span>
	<span class="n">ABS_MT_POSITION_X</span>  <span class="n">EventCode</span> <span class="o">=</span> <span class="m">0x0035</span>
	<span class="n">ABS_MT_POSITION_Y</span>  <span class="n">EventCode</span> <span class="o">=</span> <span class="m">0x0036</span>
	<span class="n">ABS_MT_TOUCH_MAJOR</span> <span class="n">EventCode</span> <span class="o">=</span> <span class="m">0x0030</span>
	<span class="n">SYN_REPORT</span>         <span class="n">EventCode</span> <span class="o">=</span> <span class="m">0x0000</span>
<span class="p">)</span>

<span class="c">// Value field of BTN_TOUCH, BTN_TOOL_FINGER</span>
<span class="k">const</span> <span class="p">(</span>
	<span class="n">TOUCH_VALUE_DOWN</span> <span class="o">=</span> <span class="m">0x00000001</span>
	<span class="n">TOUCH_VALUE_UP</span>   <span class="o">=</span> <span class="m">0x00000000</span>
<span class="p">)</span>

<span class="c">// This event happens more often; marks the start/end of a sequence</span>
<span class="k">var</span> <span class="n">eventSynReport</span> <span class="o">=</span> <span class="n">InputEvent</span><span class="p">{</span>
    <span class="n">Type</span><span class="o">:</span>  <span class="n">EV_SYN</span><span class="p">,</span>
    <span class="n">Code</span><span class="o">:</span>  <span class="n">SYN_REPORT</span><span class="p">,</span>
    <span class="n">Value</span><span class="o">:</span> <span class="m">0x00000000</span><span class="p">,</span>
<span class="p">}</span>

<span class="c">// touch is the whole sequence of events that simulates a single tap</span>
<span class="c">// While testing it seemed like not all SYN_REPORT events are necessary,</span>
<span class="c">// but we will just use the same sequence as observed above</span>
<span class="k">var</span> <span class="n">touch</span> <span class="o">=</span> <span class="p">[]</span><span class="n">InputEvent</span><span class="p">{</span>
    <span class="p">{</span>
        <span class="n">Type</span><span class="o">:</span>  <span class="n">EV_ABS</span><span class="p">,</span>
        <span class="n">Code</span><span class="o">:</span>  <span class="n">ABS_MT_TRACKING_ID</span><span class="p">,</span>
        <span class="n">Value</span><span class="o">:</span> <span class="m">0x0000e800</span><span class="p">,</span> <span class="c">// Touch tracking ID, seems like we don't need to care about it</span>
    <span class="p">},</span>
    <span class="c">// Pretend to put the finger down</span>
    <span class="p">{</span>
        <span class="n">Type</span><span class="o">:</span>  <span class="n">EV_KEY</span><span class="p">,</span>
        <span class="n">Code</span><span class="o">:</span>  <span class="n">BTN_TOUCH</span><span class="p">,</span>
        <span class="n">Value</span><span class="o">:</span> <span class="n">TOUCH_VALUE_DOWN</span><span class="p">,</span>
    <span class="p">},</span>
    <span class="p">{</span>
        <span class="n">Type</span><span class="o">:</span>  <span class="n">EV_KEY</span><span class="p">,</span>
        <span class="n">Code</span><span class="o">:</span>  <span class="n">BTN_TOOL_FINGER</span><span class="p">,</span>
        <span class="n">Value</span><span class="o">:</span> <span class="n">TOUCH_VALUE_DOWN</span><span class="p">,</span>
    <span class="p">},</span>
    <span class="c">// Top left corner</span>
    <span class="p">{</span>
        <span class="n">Type</span><span class="o">:</span>  <span class="n">EV_ABS</span><span class="p">,</span>
        <span class="n">Code</span><span class="o">:</span>  <span class="n">ABS_MT_POSITION_X</span><span class="p">,</span>
        <span class="n">Value</span><span class="o">:</span> <span class="m">0x00000071</span><span class="p">,</span>
    <span class="p">},</span>
    <span class="p">{</span>
        <span class="n">Type</span><span class="o">:</span>  <span class="n">EV_ABS</span><span class="p">,</span>
        <span class="n">Code</span><span class="o">:</span>  <span class="n">ABS_MT_POSITION_Y</span><span class="p">,</span>
        <span class="n">Value</span><span class="o">:</span> <span class="m">0x000000a3</span><span class="p">,</span>
    <span class="p">},</span>
    <span class="n">eventSynReport</span><span class="p">,</span>
    <span class="p">{</span>
        <span class="n">Type</span><span class="o">:</span>  <span class="n">EV_ABS</span><span class="p">,</span>
        <span class="n">Code</span><span class="o">:</span>  <span class="n">ABS_MT_TOUCH_MAJOR</span><span class="p">,</span>
        <span class="n">Value</span><span class="o">:</span> <span class="m">0x00000005</span><span class="p">,</span>
    <span class="p">},</span>
    <span class="n">eventSynReport</span><span class="p">,</span>
    <span class="p">{</span>
        <span class="n">Type</span><span class="o">:</span>  <span class="n">EV_ABS</span><span class="p">,</span>
        <span class="n">Code</span><span class="o">:</span>  <span class="n">ABS_MT_TRACKING_ID</span><span class="p">,</span>
        <span class="n">Value</span><span class="o">:</span> <span class="m">0xffffffff</span><span class="p">,</span>
    <span class="p">},</span>
    <span class="c">// Now put the finger up again</span>
    <span class="p">{</span>
        <span class="n">Type</span><span class="o">:</span>  <span class="n">EV_KEY</span><span class="p">,</span>
        <span class="n">Code</span><span class="o">:</span>  <span class="n">BTN_TOUCH</span><span class="p">,</span>
        <span class="n">Value</span><span class="o">:</span> <span class="n">TOUCH_VALUE_UP</span><span class="p">,</span>
    <span class="p">},</span>
    <span class="p">{</span>
        <span class="n">Type</span><span class="o">:</span>  <span class="n">EV_KEY</span><span class="p">,</span>
        <span class="n">Code</span><span class="o">:</span>  <span class="n">BTN_TOOL_FINGER</span><span class="p">,</span>
        <span class="n">Value</span><span class="o">:</span> <span class="n">TOUCH_VALUE_UP</span><span class="p">,</span>
    <span class="p">},</span>
    <span class="n">eventSynReport</span><span class="p">,</span>
<span class="p">}</span>
</code></pre></div></div>

<p>Now we just write our sequence to the device file <code class="language-plaintext highlighter-rouge">f</code>:</p>

<div class="language-go highlighter-rouge"><div class="highlight"><pre class="highlight"><code><span class="c">// Assumption: f is the opened display device file /dev/input/event1</span>
<span class="k">for</span> <span class="n">_</span><span class="p">,</span> <span class="n">ievent</span> <span class="o">:=</span> <span class="k">range</span> <span class="n">touch</span> <span class="p">{</span>
    <span class="n">err</span> <span class="o">:=</span> <span class="n">binary</span><span class="o">.</span><span class="n">Write</span><span class="p">(</span><span class="n">f</span><span class="p">,</span> <span class="n">binary</span><span class="o">.</span><span class="n">LittleEndian</span><span class="p">,</span> <span class="n">ievent</span><span class="p">)</span>
    <span class="k">if</span> <span class="n">err</span> <span class="o">!=</span> <span class="no">nil</span> <span class="p">{</span>
        <span class="nb">panic</span><span class="p">(</span><span class="s">"writing input event: "</span> <span class="o">+</span> <span class="n">err</span><span class="o">.</span><span class="n">Error</span><span class="p">())</span>
    <span class="p">}</span>
<span class="p">}</span>
</code></pre></div></div>

<p>You can find the whole program <a href="https://github.com/xarantolus/backtap/blob/main/cmd/singletap/main.go">here</a>.</p>

<p>One interesting detail about the sequence is that it doesn’t always have to be the same. Sometimes, there are more <code class="language-plaintext highlighter-rouge">SYN_REPORT</code> events in a sequence, but interestingly they do not appear to change the result. According to the <a href="https://www.kernel.org/doc/html/v4.15/input/event-codes.html#ev-syn">documentation</a>, if no <code class="language-plaintext highlighter-rouge">SYN_REPORT</code> has been sent between two events, they are seen as sent in the same moment of time; so this event type acts as a separator.</p>

<p>Now that we have the code for a single tap, we can of course adjust the code to be able to tap any position by simply changing the <code class="language-plaintext highlighter-rouge">x</code> and <code class="language-plaintext highlighter-rouge">y</code> values.</p>

<p>In my tests this program has been <strong>a lot</strong> faster than the method with the <code class="language-plaintext highlighter-rouge">input</code> command, which was a nice outcome.</p>

<h3 id="actually-using-it">Actually using it</h3>
<p>Now that we have done all the work to get a working tap program, we only need to integrate it into a program that detects the fingerprint press, then sends those events. I’ll spare you the details on that, you can see the whole program on <a href="https://github.com/xarantolus/backtap">GitHub</a>.</p>

<p>It’s basically a daemon that runs in the background and detects the aforementioned log lines to react with a tap. It also has a few more commands, but they are not as technically interesting as the tap.</p>

<p>I also packaged the program into a <a href="https://github.com/topjohnwu/Magisk">Magisk</a> (root solution with addons) module as that allows me to easily run it on boot.</p>

<h3 id="further-ideas">Further ideas</h3>
<p>One could use <code class="language-plaintext highlighter-rouge">getevent</code> and this method of writing events to create an event recorder that can accurately replay sequences of events. So if you want to automatically input a pin on the lock screen, that should be possible (the screen device file doesn’t have any restrictions on <em>when</em> the tap can happen, I think the <code class="language-plaintext highlighter-rouge">input</code> command is limited to an unlocked phone only, no lock screen access).</p>

<h3 id="thanks">Thanks</h3>
<p>If you found this interesting and want to create something like this or adapt the program for your phone, take a look at the <a href="https://github.com/xarantolus/backtap">repository</a>.</p>

<p>If there are any mistakes in this post please feel free to point them out (by email, reddit etc.). Thank you :)</p>

<p>This post is also available on <a href="https://dev.to/xarantolus/how-to-tap-the-android-screen-from-the-underlying-linux-system-34jf">dev.to</a> in case you want to comment there.</p>]]></content><author><name>xarantolus</name><email>x@010.one</email></author><summary type="html"><![CDATA[In recent years phone screens seem to only have gotten bigger. This is great because it allows you to see more on your screen, but it also has some drawbacks. One of them has been very annoying to me: I can no longer reach buttons at the top left of the screen in a comfortable way.]]></summary><media:thumbnail xmlns:media="http://search.yahoo.com/mrss/" url="https://blog.010.one/assets/taptap/preview.png" /><media:content medium="image" url="https://blog.010.one/assets/taptap/preview.png" xmlns:media="http://search.yahoo.com/mrss/" /></entry><entry><title type="html">How to run a python script from GitHub, no experience required</title><link href="https://blog.010.one/run-python-script-from-github-no-experience-required" rel="alternate" type="text/html" title="How to run a python script from GitHub, no experience required" /><published>2021-01-08T00:00:00+00:00</published><updated>2021-01-08T00:00:00+00:00</updated><id>https://blog.010.one/run-python-script-from-github-no-experience-required</id><content type="html" xml:base="https://blog.010.one/run-python-script-from-github-no-experience-required"><![CDATA[<p>In the past weeks people often asked me how to run a python script they found on GitHub. So here’s a full guide for beginners on how to do that, which pitfalls exist and how to avoid them.</p>

<p>I will explain all necessary details you need to know to get it running using examples, screenshots and videos.</p>

<p>But before starting please make sure the following is true:</p>
<ul>
  <li>You’re using Windows 10</li>
  <li>The project you’re trying to run is using Python as programming language. GitHub will show a “Languages” section at the right side of the project page, which should look like this:</li>
</ul>

<div class="center-image"><img src="assets/2021-01-08-run-python-script-from-github-no-experience-required/github-programming-language.png" alt="The languages section should list 'Python'" /><p class="image-hint">You can click images to enlarge them</p></div>

<p>So here’s our plan:</p>

<ol>
  <li><a href="#preparation">Preparation</a></li>
  <li><a href="#python-installation">Install Python</a></li>
  <li><a href="#script-installation">Install the script you want to run</a></li>
  <li><a href="#script-run">Run the script</a></li>
</ol>

<p>If anything unexpected happens along the way, you can also jump to the <a href="#it-doesnt-work">help section</a> to see if there’s a tip for you.</p>

<h3 id="preparation">Preparation</h3>
<p>In the beginning, we will need to prepare some settings to make sure the installation process works correctly.</p>

<h4 id="disabling-preinstalled-aliases">Disabling preinstalled aliases</h4>
<p>Windows 10 comes with certain shortcuts preinstalled, which can be annoying when starting a python script. This is why we disable them.</p>

<p>To do so, search for “Manage App execution aliases” in the Windows 10 search bar typically located at the lower left side:</p>

<div class="center-image"><img src="assets/2021-01-08-run-python-script-from-github-no-experience-required/windows-search-bar.png" alt="Windows search bar" /></div>

<p>In this settings window, we’ll disable everything that has to do with Python, which includes “python”, “idle” and the app installer that also mentions “python.exe”. After that, it should look similar to this:</p>

<div class="center-image"><img src="assets/2021-01-08-run-python-script-from-github-no-experience-required/windows-settings-app-alias.png" alt="Windows settings: App execution aliases" /></div>

<h3 id="python-installation">Install Python</h3>
<p>Now that we prepared everything, we can proceed by installing Python. Python is the programming language used by the project we want to use. Later, we’ll basically tell the “python” program to start the program we got from GitHub.</p>

<p>To start off, we might need to know which version to install. Do a quick check if the program you want to use mentions a specific version (e.g. “above version 3.4” or “use python version 3.8 or higher”). If it doesn’t mention the version, just choose the newest one.</p>

<h4 id="download">Download</h4>
<p>Head over to <a href="https://www.python.org/downloads/">the official download page</a> and either download the newest version or choose the version that was specified on the projects’ page:</p>

<div class="center-image"><img src="assets/2021-01-08-run-python-script-from-github-no-experience-required/python-version-selection.png" alt="Python download page" /></div>

<p>If you choose a specific version, you’ll get to the download page of that version. Find the “Files” section there and click on “Windows installer (64-bit)”:</p>

<div class="center-image"><img src="assets/2021-01-08-run-python-script-from-github-no-experience-required/python-specific-installer-selection.png" alt="Select this installer from the files section" /></div>

<h4 id="installation">Installation</h4>
<p>Now that we downloaded the correct package, we need to run the installer.
Make sure the “Add Python to PATH” box is checked and continue with “Install Now”.</p>

<div class="center-image"><img src="assets/2021-01-08-run-python-script-from-github-no-experience-required/python-installer-settings.png" alt="Python installer settings" /></div>

<p>If you get an error during the installation, you might want to start the installer again, but with admin rights from the beginning. To do that, right-click the file and choose “Run as administrator”.</p>

<h4 id="finding-python">Finding python</h4>
<p>Now use the Windows 10 search bar to make sure python is installed (just search “Python”). If you installed Python 3.9.1 (like I did), you should find it there. Please note that the other versions shown here are <strong>not important for us</strong> and you only need the one you installed.</p>

<div class="center-image"><img src="assets/2021-01-08-run-python-script-from-github-no-experience-required/python-installed-search.png" alt="Windows 10 search listing for python" /></div>

<p>After clicking on the right arrow near the program name, the menu shown here should come up. There, we’ll click “Open file location”.</p>

<p>A new window should open with a file listing. There, we right-click on the selected file and again open its file location:</p>

<div class="center-image"><img src="assets/2021-01-08-run-python-script-from-github-no-experience-required/open-file-location.png" alt="Click 'Open file location' for this step" /></div>

<p>This will lead to the directory we actually need. One file named “python” will already be selected:</p>

<div class="center-image"><img src="assets/2021-01-08-run-python-script-from-github-no-experience-required/python-directory.png" alt="This is the directory we want" /></div>

<p>Please keep this window open for later, we’ll need it.</p>

<h3 id="script-installation">Script installation</h3>
<p>Now everything is prepared and we can finally install the actual script.</p>

<p>This is where your part will likely be a bit different from what I’m doing, but the general stuff should be the same.</p>

<p>The project you want to use likely has installation instructions. You should follow them, but to do that you need to know several things:</p>

<h5 id="open-command-prompt">Open Command prompt</h5>
<p>Instructions are often written as commands issued to the computer.</p>

<p>They might look like this:</p>

<div class="language-plaintext highlighter-rouge"><div class="highlight"><pre class="highlight"><code>pip install -U gallery-dl
</code></pre></div></div>

<p>or</p>

<div class="language-plaintext highlighter-rouge"><div class="highlight"><pre class="highlight"><code>python -m pip install -U gallery-dl
</code></pre></div></div>

<p>or</p>

<div class="language-plaintext highlighter-rouge"><div class="highlight"><pre class="highlight"><code>python3 script.py
</code></pre></div></div>

<p>or</p>

<div class="language-plaintext highlighter-rouge"><div class="highlight"><pre class="highlight"><code>python script.py
</code></pre></div></div>

<p>You have to type these into the command prompt, which is a window we’ll open next. Type in “cmd” in the search bar and open it.</p>

<div class="center-image"><img src="assets/2021-01-08-run-python-script-from-github-no-experience-required/command-prompt-search.png" alt="Open command prompt" /></div>

<p>It’s just a window where we can type in text:</p>

<div class="center-image"><img src="assets/2021-01-08-run-python-script-from-github-no-experience-required/empty-command-prompt.png" alt="An empty command prompt" /></div>

<p>Now we have at least three windows open:</p>
<ul>
  <li>The one that contains the “python” / “python.exe” file (we opened it in <a href="#finding-python">“Finding python”</a> before)</li>
  <li>The command prompt window we just opened</li>
  <li>Your browser with this page and the project page</li>
</ul>

<h5 id="script-installation">Script installation</h5>
<p>Here comes the part where we actually install the program we want to use.</p>

<p>Let’s imagine I wanted to download all images from <a href="https://www.flickr.com/photos/spacex/">this Flickr account</a>. I found the command-line tool <a href="https://github.com/mikf/gallery-dl">gallery-dl</a> on GitHub and want to install it.</p>

<p>Its installation instructions mention the following:</p>

<div class="language-plaintext highlighter-rouge"><div class="highlight"><pre class="highlight"><code>pip install -U gallery-dl
</code></pre></div></div>

<p>When you type that into the command line, it <em>might</em> work. To make sure it works 100% sure, we have to do some extra steps:</p>

<ol>
  <li>Drag &amp; drop the “python” file from our opened window into the command prompt. This will fill in a long path.</li>
  <li>Write a space character (just “ “, without quotes) in the command prompt window</li>
  <li>This would start <code class="language-plaintext highlighter-rouge">python</code>, but we want to start <code class="language-plaintext highlighter-rouge">pip</code> (first word in the command above). We tell python to start pip by adding <code class="language-plaintext highlighter-rouge">-m</code>, then our actual command (<code class="language-plaintext highlighter-rouge">pip install -U gallery-dl</code>) that should be started. This is the command we actually type in:
    <div class="language-plaintext highlighter-rouge"><div class="highlight"><pre class="highlight"><code>C:\directory\python.exe -m pip install -U gallery-dl
</code></pre></div>    </div>
  </li>
</ol>

<p>Here’s a quick video on how it works:</p>

<p>
<video controls="" muted="" style="width:100%;height:100%;margin-left:auto;margin-right:auto;object-fit:cover">
    <source src="assets/2021-01-08-run-python-script-from-github-no-experience-required/drag-drop-python.webm" type="video/webm" />
    <source src="assets/2021-01-08-run-python-script-from-github-no-experience-required/drag-drop-python.mp4" type="video/mp4" />
    Your browser does not support the playing these videos.
</video></p>

<p>In general you’ll be given some commands you should type in to install. For each command, we try the following schema.</p>

<p>If the it starts with…</p>
<ul>
  <li><code class="language-plaintext highlighter-rouge">python</code> / <code class="language-plaintext highlighter-rouge">python3</code> / <code class="language-plaintext highlighter-rouge">py</code>: drag &amp; drop python in the command prompt window, add a space and then copy everything after the word <code class="language-plaintext highlighter-rouge">python</code> / <code class="language-plaintext highlighter-rouge">python3</code> in there (add a space between the long python path and everything else)</li>
  <li><code class="language-plaintext highlighter-rouge">pip</code> / <code class="language-plaintext highlighter-rouge">pip3</code>: you want to drag &amp; drop python in the window, then write a space, then <code class="language-plaintext highlighter-rouge">-m pip</code>, then another space and everything after the word <code class="language-plaintext highlighter-rouge">pip</code> / <code class="language-plaintext highlighter-rouge">pip3</code></li>
  <li>anything else: you likely have to do the same as above, add <code class="language-plaintext highlighter-rouge">-m</code> (with a space in front of it!) and then type in/paste the whole command. If it doesn’t work on the first try replace any <code class="language-plaintext highlighter-rouge">_</code> (after <code class="language-plaintext highlighter-rouge">-m</code>) with <code class="language-plaintext highlighter-rouge">-</code> (or vice-versa)</li>
</ul>

<p>Now type in all commands that are given/required by the authors of the script.</p>

<p>If you ever accidentally press enter too early and now you’re stuck in python’s interactive mode (the line where you type will start with <code class="language-plaintext highlighter-rouge">&gt;&gt;&gt;</code>), you can type in <code class="language-plaintext highlighter-rouge">exit()</code> to get back to the normal command line.</p>

<div class="center-image"><img src="assets/2021-01-08-run-python-script-from-github-no-experience-required/python-interactive.png" alt="This is pythons' interactive mode" /></div>

<h3 id="script-run">Run the script</h3>
<p>The project page mentions that I can run gallery-dl by typing this in the command prompt:</p>

<div class="language-plaintext highlighter-rouge"><div class="highlight"><pre class="highlight"><code>gallery-dl 
</code></pre></div></div>

<p>But that might not work.</p>

<p>This is why we now drop python in the command prompt again, add <code class="language-plaintext highlighter-rouge">-m</code> (with space in front of it) and then finally add the command from above:</p>

<div class="center-image"><img src="assets/2021-01-08-run-python-script-from-github-no-experience-required/gallery-dl-error.png" alt="There was an error: 'no module named gallery-dl'" /></div>

<p>Oh no, it couldn’t be found! One thing we can try in such a case is replacing the dash <code class="language-plaintext highlighter-rouge">-</code> with an underscore <code class="language-plaintext highlighter-rouge">_</code>, e.g. <code class="language-plaintext highlighter-rouge">gallery-dl</code> becomes <code class="language-plaintext highlighter-rouge">gallery_dl</code>. You can also try it the other way around, e.g. <code class="language-plaintext highlighter-rouge">youtube_dl</code> becomes <code class="language-plaintext highlighter-rouge">youtube-dl</code>. Often one of these tricks works.</p>

<p>And… it worked! At least the output we got is from the actual program.</p>

<div class="center-image"><img src="assets/2021-01-08-run-python-script-from-github-no-experience-required/gallery-dl-success.png" alt="We could start gallery_dl" /></div>

<p>But there’s still an error because we didn’t tell the program what to do.
Note that it also tells us that we can add <code class="language-plaintext highlighter-rouge">--help</code> (make sure you add a space between the program name and <code class="language-plaintext highlighter-rouge">--help</code>) at the end “to get a list of all options”, as in the program will tell us what it can do (and how we specify it).</p>

<p>Please note that even though the program tells us that we can use <code class="language-plaintext highlighter-rouge">gallery-dl --help</code> to get more information, we still need to do our drag &amp; drop routine from before. As in dragging python in there, writing a space, writing <code class="language-plaintext highlighter-rouge">-m</code> (again, adding spaces around it) and finally write the actual command it tells us to run.</p>

<div class="language-plaintext highlighter-rouge"><div class="highlight"><pre class="highlight"><code>C:\directory\python.exe -m gallery_dl --help
</code></pre></div></div>

<p>Here we used the third point from our schema above to start the program.</p>

<h5 id="command-line-arguments">Command-line arguments</h5>
<p>Most command-line programs don’t ask interactively what they are supposed to do, they expect you to tell them from the start.</p>

<p>In the case of <code class="language-plaintext highlighter-rouge">gallery-dl</code> it’s the following pattern:</p>

<div class="language-plaintext highlighter-rouge"><div class="highlight"><pre class="highlight"><code>usage: __main__.py [OPTION]... URL...
</code></pre></div></div>

<p>The <code class="language-plaintext highlighter-rouge">__main__.py</code> part could also be just the name of the program, as in:</p>

<div class="language-plaintext highlighter-rouge"><div class="highlight"><pre class="highlight"><code>usage: gallery-dl [OPTION]... URL...
</code></pre></div></div>

<p><code class="language-plaintext highlighter-rouge">[OPTION]</code> means that there are <strong>optional</strong> (because of the brackets <code class="language-plaintext highlighter-rouge">[]</code>) options we can use.</p>

<p><code class="language-plaintext highlighter-rouge">URL...</code> means that <code class="language-plaintext highlighter-rouge">gallery-dl</code> for example expects <strong>one or multiple</strong> (because of the dots <code class="language-plaintext highlighter-rouge">...</code>) URLs of galleries to download.</p>

<p>The order of these is important for most programs. As in the options (if any) come first, then anything else (e.g. URLs, filenames).</p>

<p>Sometimes there are options that are together with a filename (or any text really), e.g. <code class="language-plaintext highlighter-rouge">gallery-dl</code>’s <code class="language-plaintext highlighter-rouge">--write-log</code> option:</p>

<div class="language-plaintext highlighter-rouge"><div class="highlight"><pre class="highlight"><code>--write-log FILE          Write logging output to FILE
</code></pre></div></div>

<p>This means that when we write <code class="language-plaintext highlighter-rouge">--write-log</code>, the next text (after a space) must be filename. You would write it like this:</p>

<div class="language-plaintext highlighter-rouge"><div class="highlight"><pre class="highlight"><code>C:\directory\python.exe -m gallery_dl --write-log "log-file.txt" "https://www.flickr.com/photos/spacex/"
</code></pre></div></div>

<h5 id="starting-the-program">Starting the program</h5>
<p>But if we want a simple download, we add the URL to the end of the command:</p>

<div class="language-plaintext highlighter-rouge"><div class="highlight"><pre class="highlight"><code>C:\directory\python.exe -m gallery_dl "https://www.flickr.com/photos/spacex/"
</code></pre></div></div>

<p>Also, when writing an URL (or file path) like this in the <a href="https://en.wikipedia.org/wiki/Command-line_interface#Arguments">command line arguments</a> of a program I recommend putting quotes <code class="language-plaintext highlighter-rouge">"</code> around it as done above.</p>

<p>
<video controls="" muted="" style="width:100%;height:100%;margin-left:auto;margin-right:auto;object-fit:cover">
    <source src="assets/2021-01-08-run-python-script-from-github-no-experience-required/gallery_dl_start.webm" type="video/webm" />
    <source src="assets/2021-01-08-run-python-script-from-github-no-experience-required/gallery_dl_start.mp4" type="video/mp4" />
    Your browser does not support the playing these videos.
</video></p>

<p>So that seems to work!</p>

<p>… but wait. Where did it save these images?</p>

<p>If your program doesn’t show a path or a relative path (those with <code class="language-plaintext highlighter-rouge">.\</code> at the beginning, those that start <strong>without</strong> a drive letter like <code class="language-plaintext highlighter-rouge">C:\...</code>), the files will likely be saved in the same directory that is shown at the beginning of your command prompt (in my case it’s <code class="language-plaintext highlighter-rouge">C:\Users\aio</code>).</p>

<p>We can open that directory by typing <code class="language-plaintext highlighter-rouge">explorer .</code> in the command prompt and pressing enter.</p>

<p>If we’re looking for the image with the path <code class="language-plaintext highlighter-rouge">.\gallery-dl\flickr\Official SpaceX Photos\flickr_16169086873.png</code>, we should find a directory called <code class="language-plaintext highlighter-rouge">gallery-dl</code> in our opened folder. There is a <code class="language-plaintext highlighter-rouge">flickr</code> folder, then another <code class="language-plaintext highlighter-rouge">Official SpaceX Photos</code> folder and then there’s a bunch of images. That’s where we wanted to go.</p>

<h3 id="configuration">Configuration</h3>
<p>There are often cases where the “normal”/easiest way to start a program (just adding the URL after the start command) is not enough.</p>

<p>Often the help page can be seen by starting the program with <code class="language-plaintext highlighter-rouge">--help</code></p>

<div class="language-plaintext highlighter-rouge"><div class="highlight"><pre class="highlight"><code>C:\directory\python.exe -m gallery_dl --help
</code></pre></div></div>

<p>There you can find more options to start a program. I for example want to download the profile, but <code class="language-plaintext highlighter-rouge">gallery-dl</code> should also put it in a ZIP file. So I found this in the help text:</p>

<div class="language-plaintext highlighter-rouge"><div class="highlight"><pre class="highlight"><code>Post-processing Options:
  --zip                     Store downloaded files in a ZIP archive
</code></pre></div></div>

<p>Now I run this command with the correct order of arguments:</p>

<div class="language-plaintext highlighter-rouge"><div class="highlight"><pre class="highlight"><code>C:\directory\python.exe -m gallery_dl --zip "https://www.flickr.com/photos/spacex/"
</code></pre></div></div>

<p>And that was fast! Instead of spending way too long to download every image separately, we just instructed <code class="language-plaintext highlighter-rouge">gallery-dl</code> to do everything for us.</p>

<h5 id="an-additional-tip">An additional tip</h5>
<p>Instead of always opening the directory where python is located, then dragging it in the command prompt window, you could try this alternative (that might not work):</p>

<p>Instead of the full path, just write <code class="language-plaintext highlighter-rouge">py</code> in front of the program name, like</p>
<div class="language-plaintext highlighter-rouge"><div class="highlight"><pre class="highlight"><code>py -m gallery_dl --help
</code></pre></div></div>

<p>This shortcut can be quite nice if it’s there. But if it isn’t there you have to use the other method.</p>

<hr />

<h3 id="it-doesnt-work">Something doesn’t work</h3>
<p>When <em>something</em> doesn’t work, it can be quite frustrating and confusing. That’s normal.</p>

<p>Here are some things you can do:</p>
<ul>
  <li>Search the internet for your error message. Often adding the script name (e.g. <code class="language-plaintext highlighter-rouge">gallery-dl</code>) to the search yields results from people who have run into similar errors</li>
  <li>Look on the project page if there are any hints.</li>
  <li>Go to the “Issues” tab of the projects’ GitHub page and type the error message in the search bar. Often someone else already created an issue with details. If not, you can create one. Most projects are happy to answer any question you have.</li>
  <li>Use an alternative program that does the same. Often older projects that weren’t updated in the last few months are no longer worked on and would require changes to work again. Don’t bother with that and search for another program.</li>
  <li>You can ask on forums or Reddit how you would do a certain thing with a certain program</li>
</ul>

<p>However, it could of course also mean that this guide is incomplete or has errors.
If you think this is the case, please feel free to <a href="https://github.com/xarantolus/blog/issues">open an issue</a> or write an e-mail to <span id="mail-span"></span><script>document.getElementById('mail-span').innerText = atob('eGFyYW50b2x1c+RwbS5tZQ==').replace('ä', String.fromCharCode(8*8))</script><noscript>[not available without JavaScript]</noscript> (you can also find the address at <a href="https://github.com/xarantolus">my GitHub profile</a>). Please also feel free to open an issue/write a mail for any minor comments, feedback etc.</p>

<p>When you ask others a question about an error you got, you should definitely include these things:</p>
<ul>
  <li>What you’re trying to do, e.g. “I wanted to download all images from a Flickr profile using gallery-dl”
    <ul>
      <li>You should also provide a link to the tool you’re using, e.g. “https://github.com/mikf/gallery-dl”</li>
    </ul>
  </li>
  <li>The command you’re using to start the program, e.g. “python -m gallery-dl”</li>
  <li>The output you got from the program (post it as text, screenshots are usually hard to read), select <strong>everything</strong> and copy it to your post (don’t assume that any part of the output is unnecessary, just post the whole thing). If the forum supports it, you can format it as a code block (makes it more readable)</li>
  <li>What else you have done so far (“I installed python”)</li>
</ul>

<p>This makes it more likely that someone else can spot the error and tell you how to fix it.</p>

<p>Thank you :)</p>]]></content><author><name>xarantolus</name><email>x@010.one</email></author><summary type="html"><![CDATA[In the past weeks people often asked me how to run a python script they found on GitHub. So here’s a full guide for beginners on how to do that, which pitfalls exist and how to avoid them.]]></summary></entry></feed>